

The Legend of Zelda: A Link to the Past begins on a stormy night. Link is woken from his sleep by Princess Zelda’s voice. She speaks to him telepathically and reports that she is being held captive in the dungeon of Hyrule Castle. The magician Agahnim has already made the other descendants of the seven wise men disappear and Zelda is said to be the last. Link’s uncle then sets off for the castle and expressly orders Link to stay in the house.
Of course we don’t stick to it. In this first section of our A-Link-to-the-Past walkthrough we rescue Zelda from Hyrule Castle and take her through the catacombs to the cathedral. Afterwards we use our newfound freedom for our first big collecting round through the Lost Forest and Kakariko. We already take four of the 24 Pieces of Heart, two of the four bottles, the butterfly net, the mushroom and the Magic Powder made from it. In this way we start towards Eastern Palace with five complete hearts and very good equipment.
Left house – the lamp
As soon as you can control Link, first open the Treasure Chest at the bottom right of the house. Inside is the lamp. You could theoretically leave the house without taking them with you, as the game provides backup locations in this early section. However, there is no reason for this for our 100% route: the lamp belongs in the inventory and becomes useful during the escape from Hyrule Castle, as the catacombs are partially completely dark.
You can light torches with the lamp. Each use consumes some magical energy. At the beginning you only have a small supply of them, but you will find enough supplies under jugs on the way through the castle. Now leave Link’s house and walk north towards Hyrule Castle.
The secret entrance to Hyrule Castle
Cross the bridge in front of the castle. The main entrance is guarded by soldiers and is closed to Link. So go to the right and follow the path along the eastern outer wall to the north. At the end of the path you will find a single bush in the middle of a striking stone border. Lift it up and jump into the hole below.
Link ends up in a secret passage beneath the castle wall. Just a few steps further you will find your seriously injured uncle. Talk to him. He realizes that Link is unstoppable and gives you sword and shield. From now on you can defend yourself against the soldiers. The sword can also be used to charge a spin attack, while the shield automatically absorbs many projectiles that hit the front.
Go right into the small side room. Since we already collected the lamp in Link’s house, the chest here contains 5 Rupees. Also lift the jars and take the green magic bottle with you. Then you go back, climb the stairs and leave the secret passage within the castle walls.
Hyrule Castle – down to the dungeon
Cut away the bushes in the castle courtyard and enter the main building. Our first destination is deep beneath the castle. From the entrance room, initially head west or left, then follow the red carpet north and climb the stairs down to the basement. The green soldiers are hardly a problem, but you shouldn’t blindly attack the blue swordsmen head-on. Move around them and hit them from the side or use your greater mobility to make their attacks come to nothing.
Dungeon Map
A blue guard is waiting on the first basement floor. Defeat her and pick up the Small Key that she leaves behind. Then open the chest in the same area. Inside is the Dungeon Map from Hyrule Castle. It wouldn’t be absolutely necessary for pure game progression, but of course we don’t leave any dungeon equipment behind in our complete route.
Open the locked door and follow the stairs further down. The paths become narrower and sometimes run directly along precipices. A fall only costs some energy and sets Link back, but you should still eliminate the soldiers before pushing past them.
The Boomerang
In the next larger section, a soldier is blocking the path again. Defeat him and take the second Small Key. Then open the chest and you will receive the Boomerang. It doesn’t do much direct damage against many enemies, but is extremely useful because it stuns numerous enemies and can later return removed items to Link.
Follow the only remaining path further down to the deepest basement. Behind the next door there is already a Zelda’s cell.
Princess Zelda freeing
A heavily armored jailer with a morning star is waiting outside the cell. His attack has significantly more range than your sword and does significant damage at this point. You still don’t have to get involved in a long melee. There are several jars in the open cell next door. Pick one up, wait for an opportune moment and throw it directly at the jailer. Two hits with jugs are enough to defeat him. If you run out of mugs, you can alternatively stun him with the Boomerang and attack with the sword in the meantime.
After the fight, the Large Key falls on the ground. Use it to open Zelda’s cell and talk to it. She explains to Link that Agahnim is trying to break the seal to the Shadow World and that they urgently need to escape the castle. Open the chest in her cell. Since we already own the lamp, you will find another 5 Rupees.


With Zelda through the throne room
Now take Zelda back up the same way. In the area with narrow paths and abysses, you can use the elevated route this time and thereby shorten part of the way back. Work your way back to the large entrance hall and climb the wide stairs to the north. Behind it is the throne room.
Go with Zelda to the two thrones. On the back wall there is a large decorative shelf or royal coat of arms. Stand to the left of it and push it to the right. Zelda helps Link move the heavy construction. Behind it opens the secret escape route from the castle.
The catacombs under Hyrule Castle
The first part of the catacombs is completely dark. If you want to orientate yourself safely, you can light individual torches with the lamp. However, you don’t have to activate every one of them, because each use costs magic. Follow the hallway down and cross the rooms with snakes and bats. The Boomerang is practical here for briefly incapacitating smaller opponents from a safe distance.
In the following dark area you will find a chest with a Small Key. Use it to open the locked door to the north and follow the path into the sewers. There are numerous rats running around in the wet hallways. Some carry Rupees, but one of them has the next key. Defeat the rats until the Small Keys appears on the ground and use it to open the next locked door.
A little later you will reach a bright room with movable stone blocks. Push the matching top block north and climb the revealed stairs. Just before the exit there are two levers on the wall. Pull the right lever. This opens the passage to the cathedral. The left lever only triggers a trap.
Cathedral – Zelda is safe for now
In the cathedral you hand Zelda over to the care of the priest. He explains to Link that the sage Sahasrahla knows more about Agahnim and the legendary Master Sword. Before you leave the cathedral, be sure to open the chest at the back. Inside is a complete Heart Container. Link starts the adventure with three hearts and now has four.


First round of collection: Lost Forest
The priest is actually sending you to Kakariko, but before we search the village completely, it’s worth taking a quick detour to the Lost Forest. There we can take a Piece of Heart and the mushroom with us without having to take our own detour later. Leave the cathedral, go west and follow the path towards Kakariko. Before you enter the village, go north into the forest.
Pay particular attention to the thieves running around here. They don’t deal classic combat damage, but can steal Rupees, bombs or arrows from Link when touched. It’s not worth fighting – just avoid them.
Piece of Heart 1/24
Look for the area with a small den of thieves and a prominent formation of nine bushes in a 3×3 square. Cut away the middle bush. A hole appears underneath. Jump in and pick up your first Piece of Heart in the cave. Four Pieces of Heart automatically result in an additional Heart Container.
Collection status: 1 of 24 Pieces of Heart.
The mushroom
Leave the small cave again and continue northwest in the Lost Forest. There is a striking one between the trees Mushroom on the floor. Take him with you. He later becomes with the witch in the northeast Hyrule’s against Magic Powder exchanged. We’ll do that in this chapter because the magic shop can be reached on our journey east.
The real Master Sword is also in the Lost Forest, but it’s far too early for that. Link first needs the three amulets from Eastern Palace, Desert Palace and Tower of Hera. You can therefore ignore the numerous fake swords in the forest.
Clear Kakariko completely for the first visit
Exit the Lost Forest back south and enter Kakariko. The village is already extremely productive for our 100% pass. Here we get three more Pieces of Heart, two bottles, the butterfly net and enough Rupees and bombs so that we are well prepared for the Eastern Palace and the subsequent journey.
Piece of Heart 2/24 – Well in the northwest
First, go to the northwest corner of the village. Next to a cave entrance you will see a well, the opening of which can only be reached from the hill above. Go to the raised level and jump in from above. In the underground you open the chests and lift the jars. Here you will find 70 Rupees as well as bombs that we need immediately.
On the northern wall you can see a noticeable damaged area. Place a bomb in front of it and go through the resulting opening. In the secret room you will find more Rupees and a chest with Piece of Heart 2/24.
Piece of Heart 3/24 – Blind’s former hideout
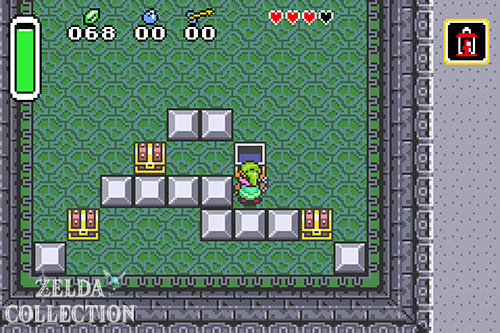
From the fountain you go east to the conspicuous building in the northern part of Kakariko. It is the former hideout of the thief Blind. Enter the house and climb into the basement. There are four between movable blocks Treasure Chests with 20 each Rupees. With a little pushing you can reach all four and in total 80 Rupees take along. If you get stuck on the block puzzle, simply climb the stairs briefly and then down again; this causes the blocks to return to their original position.
There is a crack on the northern wall of the basement. Blow it up with a bomb and go to the secret room. There are more Rupees under the jugs, Piece of Heart 3/24 is waiting in the chest.
Two bottles before the Eastern Palace
There are a total of four bottles in A Link to the Past. Two of them can be collected during this first visit to Kakariko. Because bottles can hold fairies and potions, they are some of the most useful items in the entire game.
Bottle 1/4 – Street Vendor
West of the weathercock there is a merchant sitting on a carpet. Talk to him and buy his bottle for 100 Rupees. With the well and Blind’s hiding place you should have more than enough money for it.
Collection status: 1 of 4 bottles.
Bottle 2/4: Enter the Tavern from Behind
tavern
The second bottle costs nothing. Find the long tavern in the southern part of Kakariko. You can’t reach the chest behind the counter through the normal entrance. So run to the north side of the building and enter the hidden back entrance there. In the small room behind there is a single chest. Open it and take bottle 2/4 with you.
This means you already have half of all the bottles in the game before the first regular dungeon.
The butterfly net
Directly north of the tavern lives a sick boy. After getting at least one bottle, talk to him. Since he can’t use his net at the moment, he gives Link the butterfly net. This can be used, among other things, to capture fairies and bees and store them in empty bottles.
Fairies in particular are very useful for the upcoming dungeons. If Link’s energy drops to zero while a fairy is in a bottle, it will automatically be released and revive him. We will later pass several places where it is convenient to fill bottles with fairies.
Bombs, arrows and other supplies
In the southwest of Kakariko there is a small hut with no visible entrance. Place a bomb on the southern wall and blow up an entrance. Among the jars inside you will find bombs, arrows and Rupees. The supplies reappear when you leave and re-enter the building. This gives you a reliable way to replenish your bomb supply early on.
In another house west of the sick boy you can blow up a cracked wall and open a chest with 10 arrows. You don’t own the bow yet, but the arrows are already stored in your inventory. Since we receive the sheet in the Eastern Palace, they will not be lost.
Piece of Heart 4/24 – the 15 second game
Leave the actual village center to the south and look for the long house of the two quarreling brothers. Inside, a bricked-up wall separates both halves of the house from each other. Blow up the wall with a bomb, go to the western room and leave the building through its exit. Behind it lies the so-called 15-second game.
Talk to the woman at the start. As soon as the race begins, cut your way as straight as possible through the first bushes to the north, then take the left path and run to the sign. South of it you can jump over the low fence or the edge and thereby shorten a large part of the labyrinth. If you reach the destination within 15 seconds, Piece of Heart 4/24 is waiting for you there.
There four Pieces of Heart automatically an additional one Heart Container resulting, Link owns along with that Heart Container from the cathedral now five complete hearts.



Where is Sahasrahla located?
In the village you find out that the elder Sahasrahla has left Kakariko. Talk to his grandson so that his location in the eastern part Hyrule’s is marked on your map. The game’s first regular dungeon is also located there, the Eastern Palace.
Some things in and around Kakariko are deliberately left undone for the time being. You can already see the book Mudora on a shelf in the library south of the village, but you can’t get it down yet. For this we need the Pegasus Boots, which Sahasrahla hands over after the Eastern Palace. We can only catch up with the fleeing man in Kakariko with these boots. That’s why we’ll come back here again after the Eastern Palace anyway.
Swap the mushroom for Magic Powder
Before we go to Sahasrahla, we redeem the mushroom from the Lost Forest. From Kakariko, go back towards the cathedral and then continue east to the magic shop in the northeast Hyrule’s. The witch is standing in front of the building. Equip the mushroom and give it to her. She promises to make something useful out of it.
Leave the current screen and then return to the magic shop. This time enter the building. There is now a small bag on the counter next to the dealer. Take it and you will receive the Magic Powder. It consumes magical energy and can transform numerous enemies and objects. Its effect on anti-fairies is particularly practical: if you pollinate them with Magic Powder, they transform into normal fairies and can heal Link or be caught in a bottle with the butterfly net.
You can find more optional equipment later in our overview Other items in A Link to the Past.
Sahasrahla and the path to Eastern Palace
Now the main route finally takes us east Hyrule’s. Follow the marker on your map through the rocky landscape to Sahasrahla’s hideout west of the East Palace. Speak to the wise man. He explains the history of the three amulets and first gives Link a task: He should win the Amulet of Courage in the nearby Eastern Palace.
There is a cracked wall behind Sahasrahla. You can open it now with a bomb and take the supplies there or Rupees with you. After the Eastern Palace at the latest we will come back to him anyway, because as soon as Link has the Amulet of Courage, he will receive the Pegasus Boots from Sahasrahla. These then open up numerous new possibilities in the Light World.
Some additional collectibles could theoretically already be achieved, including the Ice Rod and two additional Pieces of Heart. However, for the Eastern Palace they provide no advantage and are clearly off the current route. We therefore take them with us in the next sensible section when we pass through the relevant areas on the way to the desert palace anyway. This keeps the 100% run complete without sending Link across Hyrule multiple times for individual items.
Before the Eastern Palace you should now five hearts, four of 24 Pieces of Heart, two of four bottles, sword, shield, lamp, Boomerang, butterfly net, bombs and Magic Powder. This concludes the first major section.