

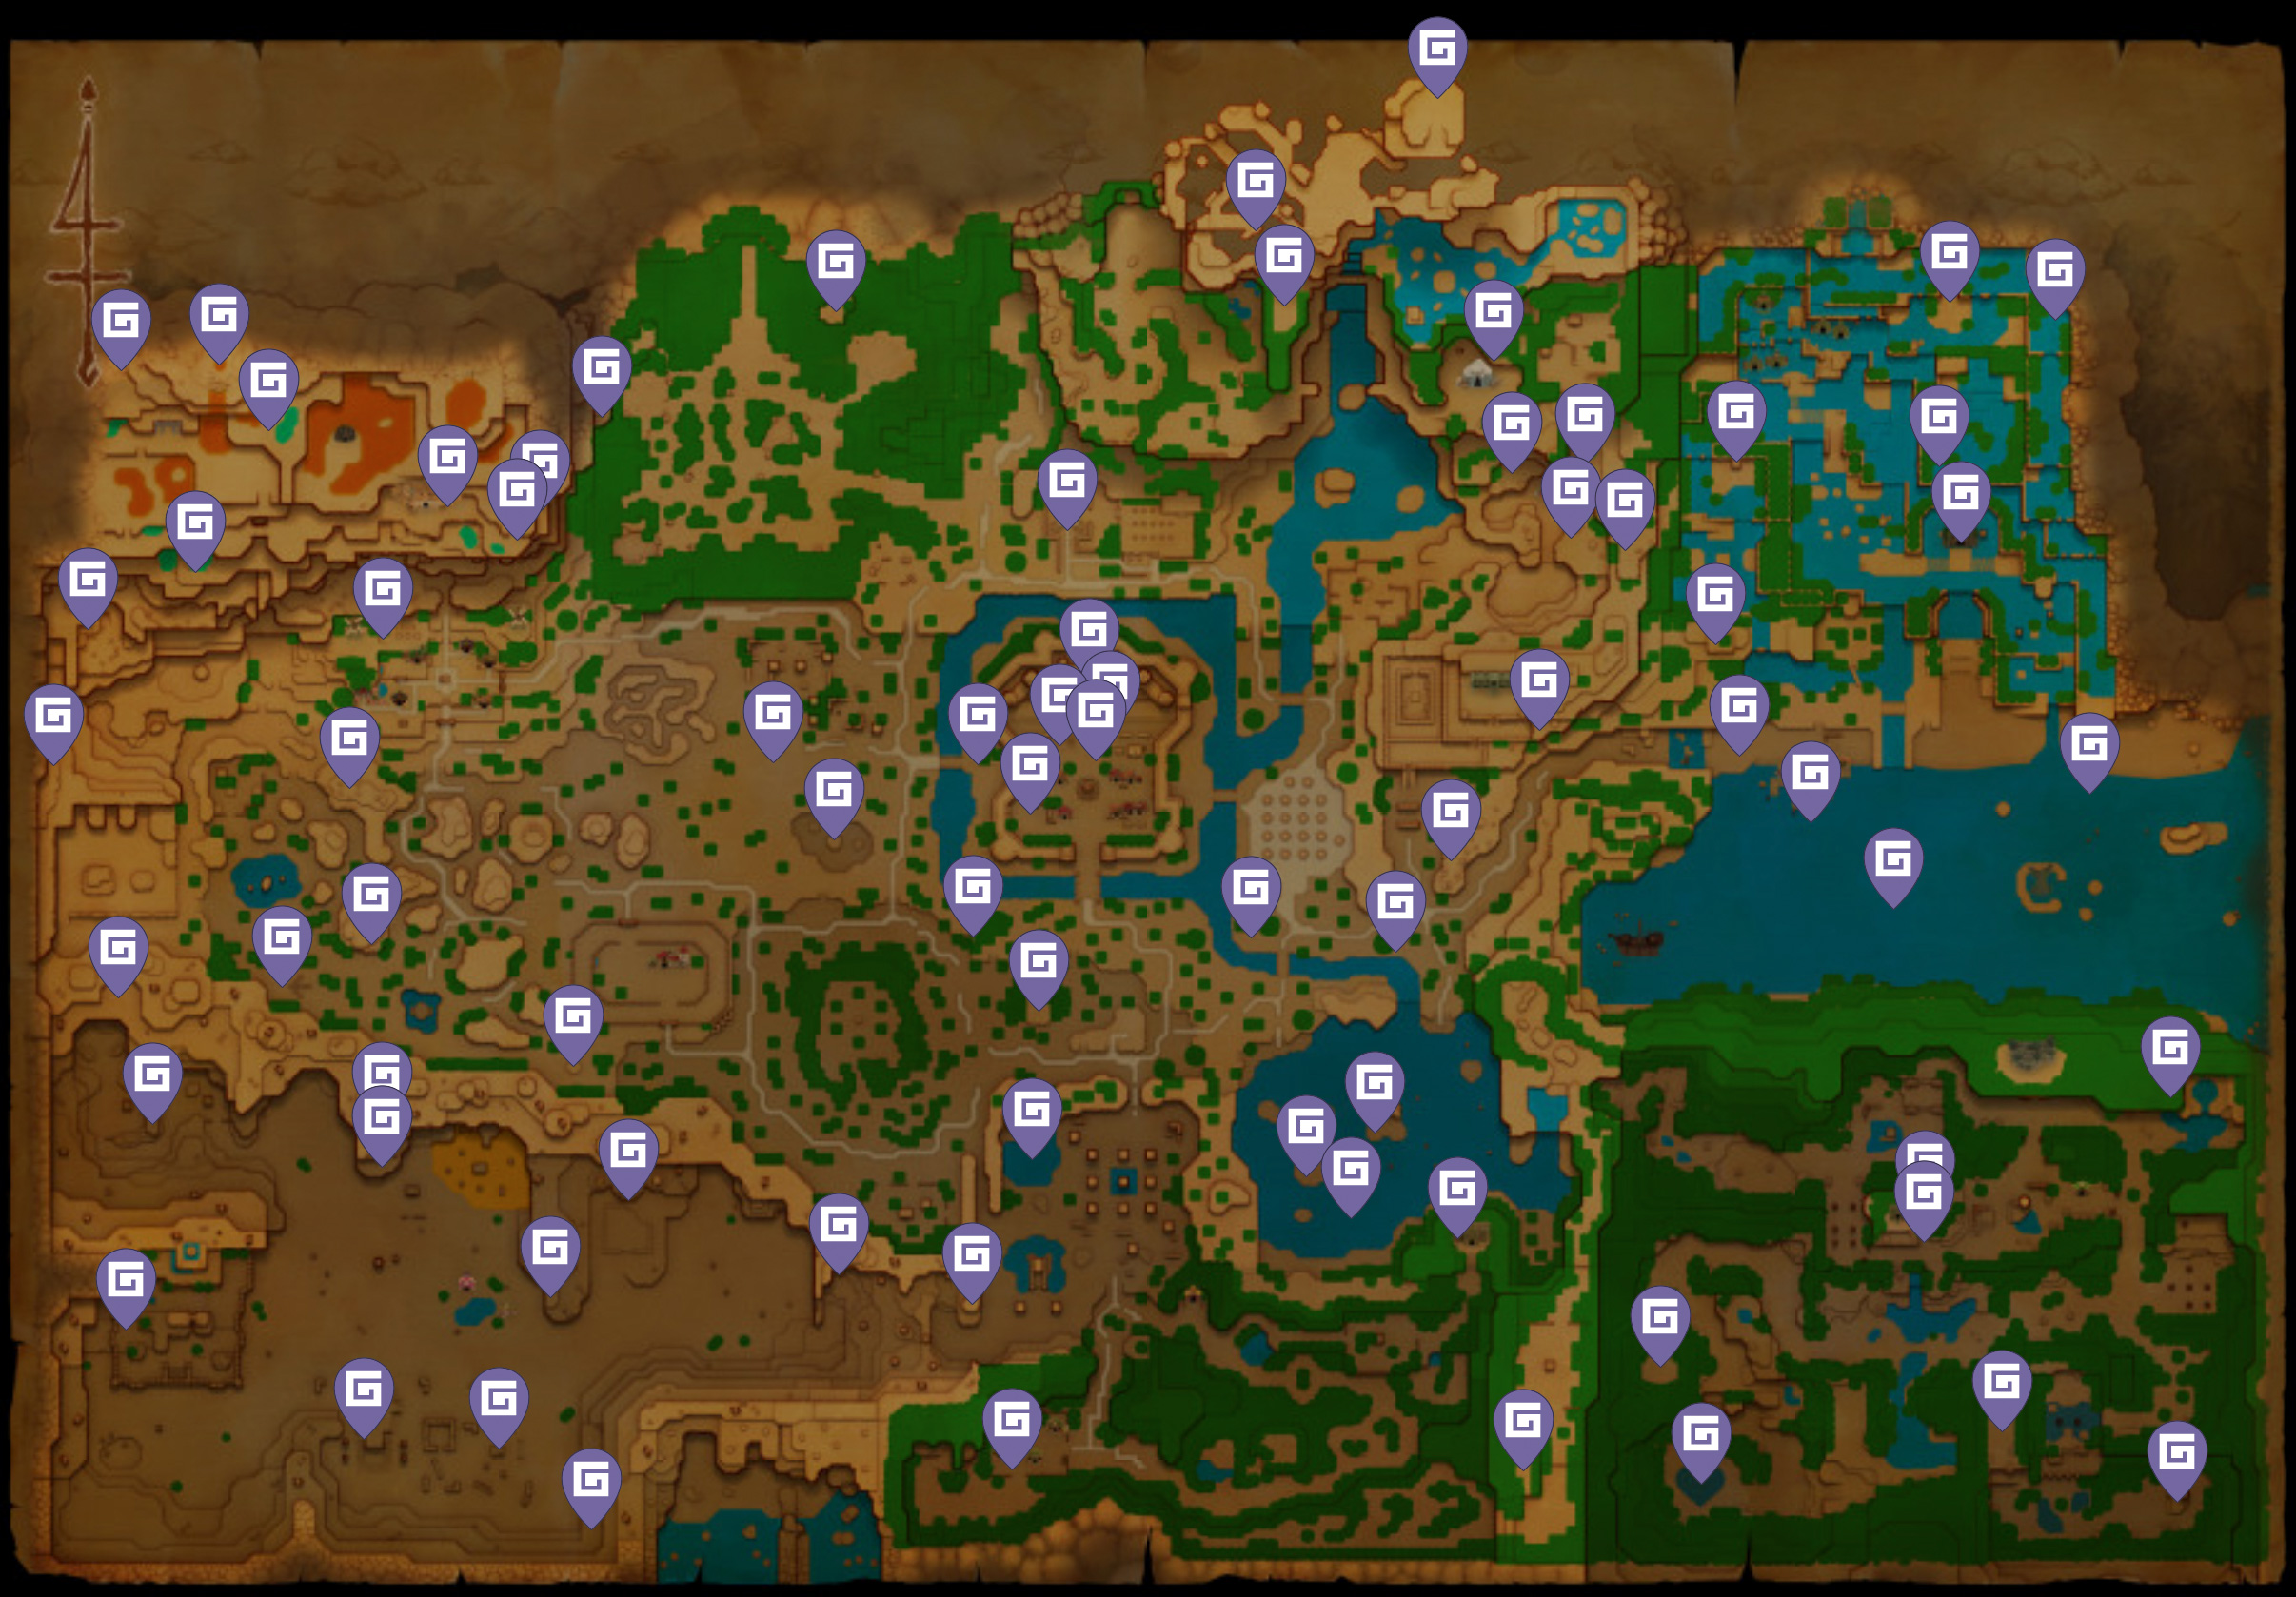
For Lueburry, Might Crystals become permanent enhancements for Zelda’s Swordfighter Form. In The Legend of Zelda: Echoes of Wisdom, a total of 150 crystals are distributed in 85 locations: under stones and plants, in chests and as rewards for rifts, Side Quests and mini games. For all weapon and energy upgrades you need 125 crystals. The remaining 25 unlock an energy recharge station in front of Lueburry’s House.
Use Might Crystals at Lueburry’s house
After the Suthorn Ruins, Lueburry explains to you in his house how his improvement machine works. Examine the machine and select the weapon or Energy bar you want to strengthen. The improvements are permanent. So feel free to spend your crystals: the crystals you have already invested also count towards the overall conclusion. You can get the sword in the Suthorn Ruins, the bow in the Gerudo Sanctum and the bombs in the Eldin Temple. You can only improve a weapon once you own it. The highest expansion levels become available after Still Missing. For starters, the first Energy upgrade is worth five crystals; Afterwards, the stronger sword helps in the short attack phases of the boss fights.
Upgrade costs
| Improvement | Cost of the next levels | Total |
|---|---|---|
| Sword of Might | 10 + 20 crystals | 30 |
| Bow of Might | 10 + 20 crystals | 30 |
| Bombs of Might | 10 + 20 crystals | 30 |
| Energy bar | 5 + 10 + 20 crystals | 35 |
| All improvements | 125 |
Find missing crystals with the Might Bell
The Might Bell rings near missing crystals as long as you wear them as accessories. You get them for The Great Fairy’s Request. The task takes you from the fairy shrine Lake Hylia to a jewelry manufacturer Gerudo Town as well as to the Sea Zoras and Gorons. The chest in the fairy shrine also contains a crystal itself. A signal does not tell you the correct amount or type of reward. When the doorbell rings, check ledges, caves and open areas Side Quests close by. A crystal from a task reward is not lying loose next to the client. For earth spots you need Holmill, one for brittle underwater plates Bombfish and for heavy moving rocks Bind.
All Locations by area
Area totals also include story rewards and later returns. The border between Suthorn and Gerudo is clearly separated: one crystal lies on the high plateau in the grassland, another on the rock wall adjacent to the west at the desert entrance.
| area | Locations | Crystals |
|---|---|---|
| Suthorn Prairie and Suthorn Forest | 6 | 11 |
| Hyrule Field and Kakariko Village | 16 | 23 |
| Hyrule Castle Town and Hyrule Castle | 5 | 12 |
| Eastern Hyrule Field | 7 | 9 |
| Lake Hylia | 3 | 4 |
| Gerudo Desert | 12 | 22 |
| Jabul Waters and Seesyde Village | 10 | 20 |
| Eldin Volcano | 9 | 20 |
| Faron Wetlands | 8 | 14 |
| Hebra Mountain and Mount Lanayru | 8 | 14 |
| Eternal Forest | 1 | 1 |
| Total | 85 | 150 |
Suthorn Prairie and Suthorn Forest – 11 crystals
You will find the first crystals around Suthorn on the main route. For finds on high rock faces, you can return later with a climbing echo or Water Blocks.
Suthorn Ruins: Seismic Talus
5 Might Crystals · K076 · Show location on map
Complete the Suthorn Ruins and defeat Seismic Talus. Use Bind to pull his sphere out of his body until you can attack the exposed core. After the fight and the rift is closed, Tri will give you five crystals. Also take the Heart Container with you before leaving the arena.
Lower Suthorn Forest in the Void
2 Might Crystals · K127 · Show location on map
After completing Still Missing, return to the small rift in southern Suthorn Forest. Rescue Tri’s friends inside to earn two Might Crystals. This is a later return visit, separate from the original Suthorn story rift.
Suthorn Village: Finding the Flying Plant
1 Might Crystal · K070 · Show location on map
After Suthorn Ruins, a resident of Suthorn Village asks you to show him a flying plant. Defeat and learn a Peahat in the Suthorn Woods, return to the client and summon the Echo next to him. For Finding the Flying Plant you will receive a crystal.
pond in Suthorn Prairie
1 Might Crystal · K036 · Show location on map
From the village we head north into the grasslands. Examine the northern of the two small ponds in the west of the area. Dive to the bottom between the Octoroks and remove the aquatic plant in the middle of the plant circle with Zelda’s Pirouette. The crystal appears underneath.
High plateau on the western edge of the grassland
1 Might Crystal · K047 · Show location on map
A high rocky area rises between Suthorn Prairie and the eastern access to Gerudo Desert. Climb the wall with a climbing echo or build a suitable echo staircase. At the top there is a single moving stone between tufts of grass. Lift it up and take the crystal underneath with you.
High cliff edge on the border with Faron
1 Might Crystal · K050 · Show location on map
Run to the eastern part of the Suthorn Forest and look for the narrow path at the border with the Faron Wetlands. Climb to the high plateau above the treetops. A single, striking bush grows in the far south of this elevated area. Remove him; the crystal lies directly underneath.
Hyrule Field and Kakariko Village – 23 crystals
The individual hiding places on the plain are often at a different height than the path. For bare areas of earth you need Holmill. You learn the echo in the Gerudo region; The Locations of the helpful echoes are in our Echo guide.
Stilled Southern Hyrule Field
2 Might Crystals · K117 · Show location on map
After the Hyrule Castle section, start the Side Quest From the Heart in Hyrule Castle Town. On the way to the intended meeting point, the corresponding small rift opens south of the city. In it, save all groups of Tri’s friends. There are two crystals for closing.
Stilled Carrot Patch
2 Might Crystals · K119 · Show location on map
First complete Runaway Horse. After saving Hyrule Castle, talk to Impa in the castle and start Impa’s Gift. On the farm you will find out about the Rift at the northern Carrot Patch. Close it to get the two crystals and Zelda’s horse.
Rift at the northern sanctuary
2 Might Crystals · K121 · Show location on map
North of Hyrule Castle lies a sanctuary that has been swallowed by a small rift. Enter it and search the floating pieces of land for all groups of Tri’s friends. Once Tri has repaired the crack, you will receive two crystals and can reach the building on the overworld again.
Hyrule Ranch: short route in the
flag race
3 Might Crystals · K060 · Show location on map
You need Zelda’s your own horse from Impa’s gift. Register for the short route on the Hyrule Ranch and pass all the flags in less than 17 seconds. Accelerate on straight stretches and pick up speed before corners. Disturbing bushes can also be moved from horseback with Bind. The record brings three crystals once.
Rock on the plateau south of the capital
1 Might Crystal · K045 · Show location on map
Exit Hyrule Castle Town to the south and follow the path towards Suthorn. At the crossroads there is an elevated plateau to the west of the path. Climb up and examine the small cross-shaped arrangement of grass and a loose Rock. The crystal lies under the Rock; So don’t just cut off the surrounding grass.
Single bush southwest of Hyrule Castle Town
1 Might Crystal · K039 · Show location on map
Southwest of the capital, a dense group of trees stands on the edge of a cliff. Look for a single bush on a narrow ledge on its western side. You can get up with boxes or beds. Remove the bush with a pirouette and collect the exposed crystal.
Grave site in the horseshoe-shaped forest
1 Might Crystal · K001 · Show location on map
Southwest of Hyrule Castle Town, trees surround a small clearing. Climb over the treetops into the forest and look for the bare patch of earth in the northwest corner. Summon Holmill there. Once the echo disappears into the ground, it reveals the hidden crystal.
bush in the Ignizol pit
1 Might Crystal · K037 · Show location on map
West of Hyrule Castle Town the terrain slopes down into a small pit with Ignizols. A raised area remains free in the middle. Overcome the height difference with a small echo staircase and remove the bush on this area. The crystal is under the bush, not in one of the enemies.
Middle Rock in the stone cross
1 Might Crystal · K057 · Show location on map
In the area west of Hyrule Castle Town you will find five stones in the shape of a cross. A Peahat may be blocking the path nearby; if necessary, move them out of the way first. Then lift the movable Rock in the middle of the cross. There is a single crystal underneath.
Underground water channel at Hyrule Ruins
1 Might Crystal · K002 · Show location on map
After closing the Hyrule Castle Rift, return to the ruins west of the capital. The exit there leads into the water canal that you know from the escape at the beginning. Search the now accessible section for the crystal. Indoor search; the marker on our map shows the access.
Small plateau south of the Hyrule Ranch
1 Might Crystal · K040 · Show location on map
From the southern exit of Hyrule Ranch, go a short distance southwest. Next to the path is a low but distinct hill with a single bush. Use a trampoline or a box as a climbing aid. The crystal lies under the bush.
Grass arrow in the west of the plain
1 Might Crystal · K056 · Show location on map
Between the ponds west of the Hyrule Ranch tufts of grass form an arrow. Follow its tip to the dense bush at the end of the formation. One pirouette is enough to remove it and reveal the crystal. The arrow itself contains no further reward.
cave west of the Hyrule Ranch
3 Might Crystals · K038 · Show location on map
On the western edge of the plain there is a cave in the rock massif. Enter it and work your way to the enemy camp with the Treasure Chest. Defeat the Moblins to release the chest. There are three crystals inside. The individual cave marker therefore counts as three collected crystals.
Bare spot in Kakariko’s cemetery
1 Might Crystal · K043 · Show location on map
In Kakariko Village, go north to the cemetery. On its western side, a small bare spot breaks up the grass cover. Place Holmill exactly on this patch of soil and let it dig. You can then pick up the individual crystal.
Stone circle southwest of Kakariko Village
1 Might Crystal · K042 · Show location on map
Exit Kakariko Village to the south and head southwest along the raised rocky areas. There is a circle of stones on a plateau. Lift the moving stone in the center to reveal the crystal underneath. You don’t have to carry stones into free spaces in the circle.
Single Rock on the western border
1 Might Crystal · K053 · Show location on map
Travel to the very west of the plain, north of the Acorn Gathering there. Climb the high, dry rocky area and look for the single stone next to a small plant at its edge. Lift it up and take the crystal with you. When the bell rings at the bottom of the path, the path first leads you upwards.
Hyrule Castle Town and Hyrule Castle – 12 Crystals
The castle, city and the acorn course at the city moat contain twelve crystals together. You will make up for the finds on the roof and in the water canal after saving the castle.
Hyrule Castle: Boss Reward
5 Might Crystals · K091 · Show location on map
Play Still Missing to the end of Hyrule Castle and defeat Ganon there. After the fight, Tri closes the large rift and gives you five crystals. This reward is part of the story completion and does not have to be searched for in the liberated city.
A Curious Child: three Zol variants show
1 Might Crystal · K069 · Show location on map
Speak to the curious boy in the southwest of Hyrule Castle Town. Summon a normal Zol, an Ignizol and a Hydro-Zol for him in sequence. Let the Hydro-Zol grow in water first so you can show it the big version. For A Curious Child there is a crystal; the later Gizmol concern is a separate task.
Acorn Gathering on the western moat
3 Might Crystals · K063 · Show location on map
The Acorn Man stands outside the western city wall. Collect his ten acorns less than 17 seconds to receive the one-time reward of three crystals. A large part of the course leads through the water. With the Zora’s Flippers you swim faster; cut corners tightly and avoid unnecessary landings.
Secret room under the weathercock
2 Might Crystals · K059 · Show location on map
Find the large bird weathercock in the western part of Hyrule Castle Town. Use Bind to connect to the statue and move it until the hidden entrance is clear. Climb into the room below and open the Treasure Chest. It contains two crystals, even if the bell reacts on the surface.
Roof of Hyrule Castle
1 Might Crystal · K005 · Show location on map
After saving the castle you can climb the outer walls. Use a climbing echo or Water Blocks to get to the roof and head to the east side next to the middle roof structure. The crystal lies under a small Rock. Search up on the roof instead of in the throne room below.
Eastern Hyrule Field – 9 crystals
There are nine crystals between the capital, the eastern temple and Dampé’s workshop. For the chest behind bars you need an Echo, which you can use from a distance on a Floor Switch.
Heavy rock on the river southeast of town
1 Might Crystal · K041 · Show location on map
Run southeast from Hyrule Castle Town to the river that flows into the Lake Hylia. Near the bridge there is a large gray boulder lying on a small grassy area. Grab it with Bind and drag it away from its original position. The crystal becomes visible underneath.
Boulders at the junction north of Lake Hylia
1 Might Crystal · K044 · Show location on map
Follow the river a little east to the crossroads north of Lake Hylia. Southwest of the intersection there is a tree next to a heavy rock. Use Bind to move the rock aside and collect the crystal underneath. This find is east of the previous river rock.
Rock south of the East Temple
1 Might Crystal · K004 · Show location on map
An elevated, long rocky area runs along the southern edge of the Eastern Temple area. Climb onto the plateau between the flat stone slabs. One of the stones can be lifted. Underneath this loose stone is the crystal; the large flat plates serve as a guide only.
High cliff southeast of the East Temple
1 Might Crystal · K051 · Show location on map
Find the cut leading towards Seesyde Village. You can climb the northern rock wall near a wanted poster. Above, east of the Eastern Temple entrance, there is a single stone on the cliff. Lift it to reveal the crystal.
Switch Cave east of Dampé’s Workshop
3 Might Crystals · K048 · Show location on map
Climb the rocky area east of Dampé’s workshop and enter the cave. Use Bind to move the rock behind the bars to clear the Floor Switch. Hold down the summon button and use a heavy echo, such as an Armos, behind the grate on the switch. Then open the chest with three crystals.
flower cross south of Dampé’s workshop
1 Might Crystal · K052 · Show location on map
South of the workshop there is a cross-shaped arrangement of white flowers on an elevated area. There is a suspicious patch of ground in the middle. Place Holmill right on top of it and let it dig. You don’t have to destroy the flowers themselves for the crystal.
Stone group northwest of Dampé’s workshop
1 Might Crystal · K046 · Show location on map
Climb the rocky area northwest of Dampé’s workshop. At the top is a small group of stones with a movable stone in the middle. Lift this middle stone. The crystal below is independent of the cave find and the grave site south of the workshop.
Lake Hylia – 4 crystals
In the Lake Hylia you need Bind for the heavy underwater rock. The chest at Great Fairy belongs to a later visit; Don’t look for her when you first enter the shrine.
Lake Hylia in the Still World
2 Might Crystals · K115 · Show location on map
Swim to the southwest island of Lake Hylia and enter the small rift there. Find all groups of Tri’s friends in the Waterscape of Void. For completely closing you will receive two crystals. The map point indicates the rift entrance on the overworld.
Large rock on the lake bottom
1 Might Crystal · K003 · Show location on map
Dive to the bottom in the southwest area of the lake, southwest of the fairy shrine. There is a large boulder lying over a depression. Grab him with Bind and pull him out of the hole. The crystal is underneath. A bombfish is not the solution for this heavy, moving rock.
Chest in the shrine of Great Fairy
1 Might Crystal · K011 · Show location on map
Later in the game, return to the shrine of the Great Fairy and expand your accessory slots there. Once the additional chest appears in front of her pool, open it for a crystal. Then the task begins for her special jewelry and the Might Bell. After making the improvements, leave the shrine and re-enter if there is no chest there yet.
Gerudo Desert – 22 crystals
The Gerudo finds extend from the eastern approach to the canyons in the northwest. Two crystals from the northern small rift only become accessible after the Hyrule Castle section. The single rock on the border with Suthorn is counted as the desert entrance in this overview.
Gerudo Sanctum: Mogryph
5 Might Crystals · K086 · Show location on map
Complete the crack in the Gerudo Desert to the boss of the Gerudo Sanctum. Lure Mogryph with a suitable bait and take advantage of its vulnerable phases. After the victory, Tri repairs the large rift and gives you five crystals.
Stilled Desert Temple Ruins
2 Might Crystals · K133 · Show location on map
During the Gerudo main mission you enter the small Rift at the desert temple ruins. Save all groups of Tri’s friends on the floating sand and stone areas. There are two crystals for closing. They are not one of the five crystals from the later main dungeon.
Stilled Northern Gerudo Desert
2 Might Crystals · K125 · Show location on map
After rescuing Hyrule Castle, another small Rift appears in the northern part of the Gerudo Desert. Enter at the marked entrance and free all groups of Tri’s friends. Tri then rewards you with two crystals. If you are missing this Rift when you first visit the desert, you must first continue the main story.
Mango Rush: all 60 fruits
3 Might Crystals · K062 · Show location on map
Play at the oasis on medium difficulty Mango Rush free. For the three crystals you have to all 60 mangoes caught in one go. Stay as central as possible between harvest waves and only turn when the fruit is within reach. With the later Dancing Outfit the radius of your pirouette becomes larger.
Elusive Tumbleweeds to Gerudo Town
2 Might Crystals · K073 · Show location on map
Speak to Gerudo in the western part of the city who wants to see a rolling brush. Outside the city, capture a brush ball with Bind and carefully carry it to the client. Avoid enemies and collisions to avoid breaking it. For Elusive Tumbleweeds you will receive two crystals.
Rock wall at the eastern desert entrance
1 Might Crystal · K020 · Show location on map
If you come from the Suthorn Prairie into the Gerudo Desert, a rock wall rises to the right of the passage. Climb the high ledge using a climbing echo or echo stairs. The crystal lies under the single stone there. Don’t confuse it with the separate stone on the plateau further east in the grasslands.
Tree stump on the ledge east of the oasis
1 Might Crystal · K017 · Show location on map
On the eastern edge of the desert there is a dead tree stump with a Rock on an elevated ledge. Reach the ledge and jump onto the stump using a trampoline. Lift the Rock and take the crystal underneath with you.
Blower Cave at the Southern Ruins
2 Might Crystals · K010 · Show location on map
South of the oasis or east of the Gerudo Sanctum there is a cave with wind blowers. Learn the Wind Cannon Echo and work your way to the chamber with several piles of sand. Blow the sand away from the Floor Switch. The switch opens the next room, in whose chest there are two crystals.
Sand pile in the southeast desert
1 Might Crystal · K055 · Show location on map
Travel southeast from the oasis to the elevated area on the southern rock massif. There, a single pile of sand stands out from the surroundings. Point a Wind Cannon or a Tornando at it until the sand is gone. You can then pick up the crystal.
Rock above the northern cave route
1 Might Crystal · K006 · Show location on map
In the north of the desert, a cave with Beetle nests leads to a raised ledge. Climb one level higher from the exit, perhaps with a climbing echo. On the top surface lies a single Rock. There is a crystal hidden underneath.
Chest at the exit of Beetle cave
1 Might Crystal · K007 · Show location on map
Go through the cave in the northern rock massif with the Beetle nests. The upper exit leads to a ledge that you can easily miss from the desert floor. Open the chest right by the exit for a crystal. The stone on the even higher surface is a second, separate Location.
Holmill site on the narrow rocky ridge
1 Might Crystal · K009 · Show location on map
North of Gerudo Town there is a long, narrow rocky ridge running between the gorges. Climb on top of it and follow it to the single bare patch of earth. Summon Holmill directly on this spot. He digs the crystal out of the ground.
Jabul Waters and Seesyde Village – 20 crystals
With diving, bombfish and Holmill you can reach the hidden single crystals of the Zora region. For the later cat side task you need the Cat Clothes from Kakariko Village.
Jabul Ruins: Vocavor
5 Might Crystals · K081 · Show location on map
Complete the Jabul Waters rift and defeat Vocavor in Jabul Ruins. Use his rest periods to hit him with appropriate echoes or in the Swordfighter Form. After closing the large rift you will receive five crystals.
Upper Zora River in the Void
2 Might Crystals · K131 · Show location on map
During the main mission, the River Zora Village is threatened by a rift. Enter the corresponding area of nothingness and find all groups of Tri’s friends. To completely repair the crack there are two crystals.
Eastern Zora River in the Void
2 Might Crystals · K123 · Show location on map
This rift appears only after completing Still Missing at Hyrule Castle. Reach it through the cave behind the upper buildings in River Zora Village, rescue all three groups of Tri’s friends and receive two Might Crystals. It is separate from the story rift in the upper Zora River.
A Treat for My Person on the beach of Seesyde Village
1 Might Crystal · K071 · Show location on map
First get the Cat Clothes from Kakariko Village. Inside, talk to the cat by the woman on the beach west of Seesyde Village. Then mix the woman a Warm Mixed Special, for example from Warm Pepper and Tough Mango, and hand it over. For A Treat for My Person you get a crystal.
Under the southern jetty of Seesyde Village
1 Might Crystal · K065 · Show location on map
In Seesyde Village, jump from the southern jetty into the sea and dive under the far end. The purple crystal lies on the ground between the wooden posts. Swim under the dock instead of just around it, because the wood will cover the find from above.
Holmill location northwest of Seesyde Village
1 Might Crystal · K064 · Show location on map
There are several small hills north or northwest of the village. Reach the highest ledge below the western Zora River. Next to a tree you see a bare area of earth. Have Holmill dig there and take the crystal with you.
Seagrass circle in the Zora Cove
1 Might Crystal · K066 · Show location on map
Swim northeast from Sea Zora Village. Underwater, plants form a circle around a single tuft of seaweed. Dive to the bottom and remove the middle tuft with a pirouette. The crystal appears in this exact spot.
Brittle Rock on the bottom of the Zora Cove
1 Might Crystal · K049 · Show location on map
In the middle area of the Zora Cove there is a cracked stone slab underwater. Summon a Bombfish right next to it and make it explode. Take the crystal from the opened spot. Unlike the heavy rock in the Lake Hylia, here you have to blast the brittle stone.
chest north of Lord Jabu-Jabu’s Den
3 Might Crystals · K016 · Show location on map
After closing the Great Jabul Rift, you can explore the river north of Lord Jabu-Jabu’s Den again. Search the shallow water area with plants south of the monster camp there. There are three crystals in the Treasure Chest. This chest is separated from the guarded camp further west.
Moblin camp on the western Zora River
3 Might Crystals · K018 · Show location on map
On the western part of the Zora River there is a Moblin camp on a dry area. Defeat all associated enemies until the sealed chest can be opened. Open it for three crystals. A single surviving Moblin prevents you from taking the reward.
Eldin Volcano – 20 Crystals
For the Eldin round, flying echoes are useful for gliding and a fire echo is useful for the Coal. The Side Quests on Death Path are only available after the regional story section.
Eldin Temple: Volvagia
5 Might Crystals · K096 · Show location on map
Play The Rift on Eldin Volcano until the boss Volvagia. Survive his long-range attacks and use his stays on the edge of the platforms to counterattack. After the fight, you will receive five crystals for closing the large rift.
Goron City in the Still World
2 Might Crystals · K135 · Show location on map
Enter the rift at Goron City during the Eldin main mission. Free the trapped groups of Tri’s friends in the volcanic realms of the Void. Once Tri closes the rift, you will receive two crystals and can continue the story with the Gorons.
West-Stilled Eldin Volcano
2 Might Crystals · K139 · Show location on map
West of Goron City lies an additional small Rift. Inside, search for all of Tri’s friends’ groups. You get the two crystals for closing; they are not in another overworld chest at the map marker.
The Flames of Fortune
2 Might Crystals · K068 · Show location on map
After saving the region, a Goron on the western platform asks you to bring a Coal to Goron City to Limme. Pick it up with Bind and plan your route across safe areas. If it threatens to cool down, heat it again with a fire echo. There are two crystals for The Flames of Fortune.
Glide Path Trailblazer
2 Might Crystals · K067 · Show location on map
Pass Glide Path first. The Goron then challenges you to the more difficult Glide Path Trailblazer. Hold a flying echo over Zelda’s head and use the updrafts to achieve the required objectives. For successful completion you will receive two crystals.
Lizalfos camp on the western volcano trail
3 Might Crystals · K014 · Show location on map
On the western climb from Kakariko Village to the volcano lies a larger Lizalfos camp. Defeat all enemies on the corresponding platforms. Once the chest is unsealed, open it for three crystals. If the chest is still locked, also search the edges of the camp for enemies.
Chest in the far northwest
1 Might Crystal · K008 · Show location on map
Travel to Rock-Roast Quarry and continue climbing northwest onto the high rocky area. In the far northwest corner of the Greater Hyrule area, a chest awaits guarded by a Lizalfos. Defeat him and open the chest for a crystal.
Chest on the ledge east of Goron City
2 Might Crystals · K013 · Show location on map
From Goron City, go east past the hot springs and find the lower ledge on the outer rim of the volcano. Lower yourself carefully or glide across with a flying echo. There are two crystals in the chest there. Examine the height of the marker before sliding all the way down to the forest.
Narrow rocky edge on the eastern volcanic slope
1 Might Crystal · K054 · Show location on map
From the eastern edge of the volcano you can glide around the outer wall with a flying echo. Aim for the narrow ledge bordering Eternal Forest, below the higher platforms. There is a crystal under the Rock or the hidden vegetation there. Search on the ledge, not on the forest floor.
Faron Wetlands – 14 crystals
In Faron, several crystals are hidden behind plants and in the Deku Scrub Lockup. For the Rifts, it’s not enough just to enter their entrance: you have to save all groups of Tri’s friends.
Faron Temple: Gohma
5 Might Crystals · K101 · Show location on map
Complete the Faron Wetlands rift. In battle, electrify Gohma’s green weak spots to knock her down, then attack the eye. After winning and closing the main rift, you will receive five crystals.
Stilled Heart Lake
2 Might Crystals · K113 · Show location on map
One of the story cracks of the Faron Wetlands is located at the heart-shaped pool. Enter with Tri and search the floating areas for all trapped groups. For rescuing and closing the rift you get two crystals.
Rift at the house in the southeast
2 Might Crystals · K111 · Show location on map
Follow the regional plot to the house in the southeastern part of Faron Wetlands. Enter the rift near the house and free all groups of Tri’s friends. After closing there are two crystals. The subsequent story takes you to Deku Scrub Lockup, where another single crystal is waiting.
Underwater section of Deku Scrub Lockup
1 Might Crystal · K032 · Show location on map
While escaping from the Deku Scrub Lockup you will reach a well with an underwater section on the side. On the far right, a current pushes downwards from above. Place a Platboom Echo so that its movement takes you up against the current. Take the crystal with you before following the exit.
Mobbing Mothulas! at Scrubton
1 Might Crystal · K072 · Show location on map
After the regional story section, talk to the Deku in Scrubton who is suffering from the Mothulas. Go to the marked area southeast of the location and defeat the entire swarm. Then return to the client. For Mobbing Mothulas! you will receive a crystal.
Bush on the western path to Heart Lake
1 Might Crystal · K035 · Show location on map
In the western part of the swamps, a grassy path leads towards Heart Lake. Watch out for a small side path on the elevated ground. Remove the noticeable bush there to reveal the crystal underneath. The dense tree canopy can obscure the junction from a distance.
Bush circle in the south of the swamps
1 Might Crystal · K033 · Show location on map
West of the Hidden Ruin or above the cave path to the southeastern house there is a flat area with a circle of bushes. Reach the plateau via the cave route or an echo climbing aid. Remove the bush in the center of the circle and collect the crystal.
Spider web northeast of Scrubton
1 Might Crystal · K034 · Show location on map
Northeast of Scrubton there is a niche in the rock face above a small pond. Reach them from the side with a bed bridge or other suitable echo. Burn the spider web with Ignizol or Fire Keese. Behind it lies the crystal; the niche is above the water.
Hebra Mountain and Mount Lanayru – 14 crystals
Take a Chill-Proof smoothie with you for the cold high altitudes. Most of the individual crystals are found in blocks of ice; an Ignizol or another fire echo exposes them. You can find recipes in our smoothie overview.
Lanayru Temple: Skorchill
5 Might Crystals · K106 · Show location on map
Complete the Mount Lanayru rift and defeat Skorchill in the Lanayru Temple. Change your echoes depending on his fire or ice form and take advantage of the vulnerable phases. After closing the large rift there will be five crystals.
Hebra mountain cave in the Still World
2 Might Crystals · K137 · Show location on map
During the climb to Condé’s house, the main story takes you into the Rift in the mountain cave. Find all of Tri’s friends’ groups in the Still World. As a final reward you will receive two crystals. The map point is at the entrance to the cave on the overworld.
Hebra Mountain Passage: Stamp Stand Swallowed!
2 Might Crystals · K129 · Show location on map
On the Stamp Guy on the upper mountain path, a crack swallowed the Stamp Stand. Enter the rift as part of Stamp Stand Swallowed! and save all groups of Tri’s friends. You will then receive two crystals and can use the Stamp Stand, which is accessible again.
Ice block above the Blizzard cave entrance
1 Might Crystal · K028 · Show location on map
Follow the snowy path to the north to the cave entrance, which has a small raised area above it. Climb the wall with a climbing echo. Above there are tufts of grass around a Ice Block. Ignite the grass with a fire echo to melt the ice and release the crystal.
Rock with the Wolfos in the lower mountain area
1 Might Crystal · K026 · Show location on map
Wolfos are hanging around on the snowy path in front of the broken bridge. Stick to the southwest ridge and look for a single moving Rock in the corner among the grass. Pick it up after the fight. This crystal is not in a Ice Block.
Ice block above the cave at Condé’s house
1 Might Crystal · K027 · Show location on map
Examine the rocky area above the cave entrance near Condé’s house. A small Ice Block hides a crystal there. Summon an Ignizol right next to it or light the surrounding grass on fire so the flames reach the ice. After melting you can pick up the crystal.
Remote plateau on ice lake
1 Might Crystal · K029 · Show location on map
Travel to the high ice lake and look for the passage over the gorge on the western edge near the waterfall. Use a Flying Tile or a suitable gliding route to reach the enclosed rock area. There is an icicle in a ring of grass. Melt it with a fire echo and collect the crystal.
ledge at Snowball gorge
1 Might Crystal · K030 · Show location on map
On the upper mountain path, large snow balls roll over the narrow paths. Just before the Waypoint, there is a small ledge south of the path with a Ice Block. Jump across without getting hit by a Snowball and melt the ice. The last single crystal of this route is waiting underneath.
Eternal Forest – 1 crystal
You can reach the forest in the north of the plain. For the crystal you have to use the treetops; You won’t find the hiding place on the normal paths below.
Bush circle on the northern plateau
1 Might Crystal · K021 · Show location on map
From the Waypoint in the Eternal Forest, go northwest towards the clearing with the Lynels. Reach the treetops with an echo climber and hike across them to the elevated area further north. Remove the middle bush in the bush circle there. There is a crystal underneath.
Reward for every 150 Crystals
After fully expanding your sword, bow, bombs and energy bar, you have invested 125 crystals. Collect the remaining 25 and talk to Lueburry again. He uses it for a fixed energy recharge station in front of his house. There you can replenish your energy without consuming a smoothie. The station remains at Lueburry; You cannot take it with you as a portable item.
If you are still missing crystals
If one or two crystals are missing, it is worth first looking at the grave sites with Holmill, the castle roof, the weathercock in Hyrule Castle Town and the chest at Great Fairy. Then check the small cracks: Some only open after story progress or during a Side Quest. If you’re exactly three crystals short, check the record rewards at the short flag race, at the Acorn Gathering west of Hyrule Castle Town and at the middle Mango Rush. Completing these mini-games normally is not enough for the crystals. The chests in the cave west of the farm, at Dampé and in the monster camps also contain several crystals at once.
On the map of Hyrule, use the filter “Might Crystals” and hide collected locations. The amounts on the markers count: a checked five reward increases your card progress by five. The map progress is a separate memory aid in the browser and is not automatically taken over from your score.
Frequently Asked Questions about Might Crystals
How many Might Crystals are there?
There are 150 crystals in 85 locations. Individual chests, Side Quests and rifts give you multiple crystals at once. Therefore, 85 card points and 150 crystals are not a contradiction.
Can I earn crystals multiple times?
The crystal rewards are unique finds. Repeated mini-games yield different prizes, but not unlimited additional crystals. You cannot collect crystals that have already been spent from their locations again.
Do I have to have 150 crystals in the Items at the same time?
No. You already spend 125 for all improvements. For Luebery’s final reward you will then need the remaining 25. Take into account invested crystals when checking your progress.
Why can’t I find a chest at the map point?
The marker can indicate a cave entrance, the entrance to a rift, or the location of a quest reward. Read the associated location text and check the altitude. For boss rewards, you get the crystals after closing the big rift. For the further collection rounds, our solutions will take you to the 40 Pieces of Heart and 25 Stamp Stands through Hyrule. The main story can be found in the Echoes of Wisdom walkthrough.
Connect return paths with the main story
After the Suthorn Ruins, the first search in the grassland is worth it. With Holmill from Gerudo you can reach grave sites, with Bombfish from Jabul you can reach brittle obstacles and with Water Block you can reach high ledges. After Hyrule Castle, more tasks and small cracks appear in areas that have already been visited. Therefore, after each major story section, return to the map entries that are still open instead of planning all chests in an area to be accessible from the start.
Return to Echoes of Wisdom Walkthrough.