

According to Aquamentus, you have four hearts. Before the second labyrinth, get the Heart Container on C1 so that the old man then gives you the white sword. From start H8, go up, left four times, up, left twice and down into the Lost Woods on G2. Exit the forest maze with up, left, down and left. From the western side, go north four times to C1. Avoid the Lynels on the dangerous screens and touch as few additional graves as possible.
Cemetery Heart, Power Bracelet and White Sword
On C1, push away the second tombstone from the left in the middle row. Enter the cave and choose the Heart Container instead of the potion. Your maximum heart bar is now five hearts. On the Armos field C5 there is also the Power Bracelet under the statue at the top right. From Cemetery C1, go south to D1 and right three times to D4. There take the eastern of the two mountain stairs north to Armos field C5. Target the upper right Armos and collect the bracelet as soon as he leaves his place.
With the bracelet you can move the rock on the far left on B2. Behind it you will receive the letter for the potion dealers. Take it with you and show it to an old woman in a medicine cave. After that, you can buy red medicine with two uses for 68 Rupees. The blue potion costs 40 Rupees and heals fully once. The dealer overview and the map of the second quest will help you with the next round of shopping.
For the white sword on A11 the route from H8 is: once right, five times up, once left, once up, three times right and again up. Avoid the Lynel in front of the waterfall cave. With at least five heart containers, the old man will give you the blade. Their higher damage is particularly helpful against the Darknuts of the second dungeon. Fill up your hearts, take bombs and medicine if possible.
The entrance under the Armos on D5
From the start you go up, three times to the left and three times up to D5. This is where the shop with the blue ring was in the first quest. Touch the middle armos of the top row and use the stairs below. The ring shop for the second quest, however, is on A16.
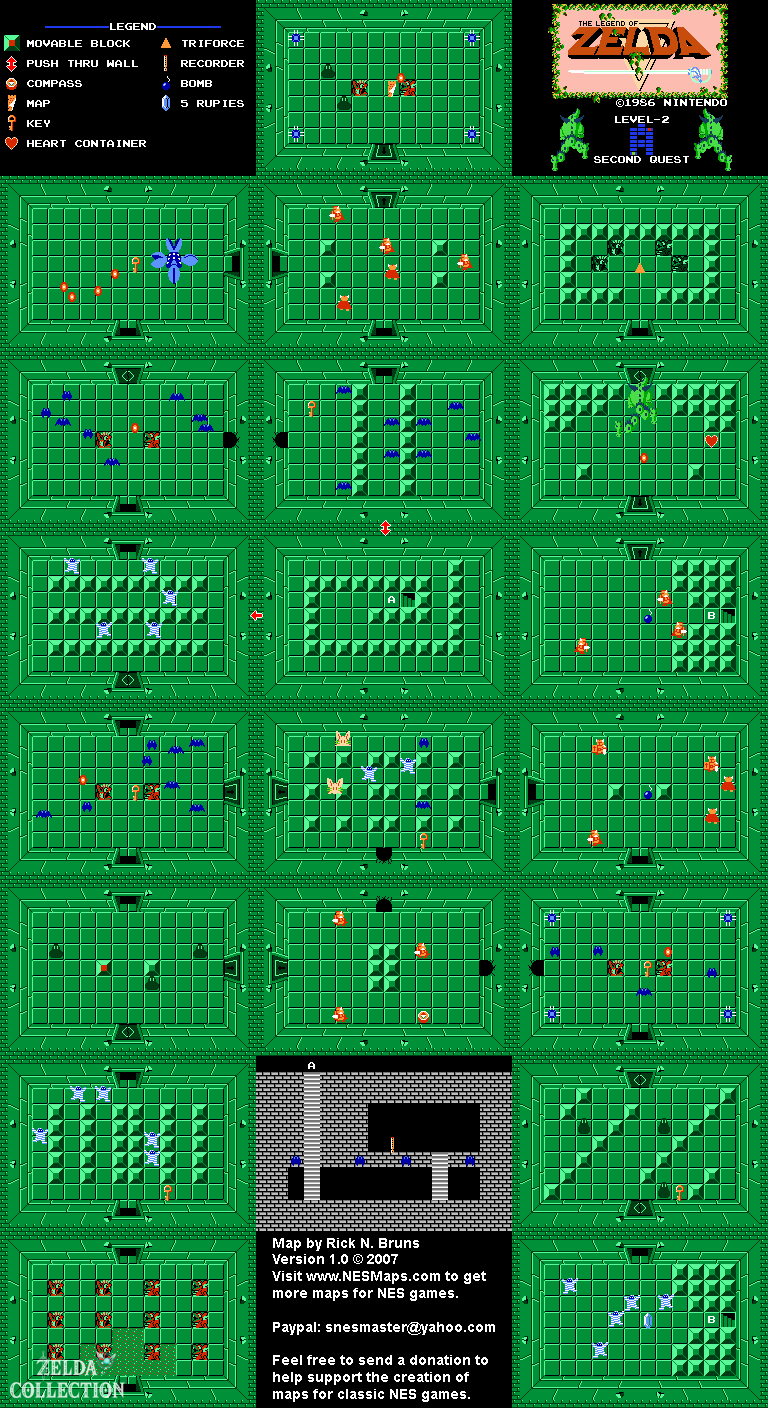
Head north out of the entrance hall and defeat all the Gibdos for a Key. Continue north and open the eastern door. The red darknuts can only be reliably hit with the sword from the side or from behind. Use the blocks to separate their paths and avoid attacks on their shields. After the victory, the Compass appears. In this room, blow up the east wall : This passage will be used later for the short way back from the Recorder area.
Return west and go north. Collect the key between the bats, go north through the next Gibdo room and north again into the upper bat room. Blow those up there East wall, get the key and return. Defeat the bats to open the northern door. Waiting behind it Manhandla. Plant a bomb so that several of his heads are caught in the same explosion. After the fight, take the key, go right and then north. Defeat the Zols and their little Gels so that the Map appears.
Through the southern false wall to the Recorder
From the map room, go south twice into the narrow corridor. Stand in the middle of the south wall and hold down. The wall is permeable. In the room behind, a staircase leads to the Recorder. You don’t get a bow here yet; the Recorder is the important dungeon find for this quest.
Return from the basement. You can only pass through the western false wall of this room in one direction. For a clearly recognizable path, instead go back through the northern false wall, go north twice to the map, south, west and then four rooms south into the Zol room two rooms above the entrance hall. Go right into the previously emptied compass room and through the already opened bomb hole to the east. Eliminate the bats and take the key. South of there is another key after the Zols. Go south again and use the stairs in the Gibdo room.
The connecting cellar takes you to red darknuts in front of the boss chamber. Defeat them when there is a lack of bombs or pass through them carefully. Use a key to open the north door. Check your hearts beforehand and make sure you can attack with the sword again after a normal bubble touch.
Gleeok with two heads
Hit Gleeok’s heads with the white sword. After a good volley of fireballs, run up to him, throw a few punches and retreat to the side. If possible, distribute the hits to both heads: As soon as a head is severed, it flies through the room on its own, making it difficult to fight the remaining neck for a long time. The Magical Shield does not replace dodging boss bullets.
After the victory, take the boss heart and in the northern room the second Triforce fragment. With the cemetery heart you now have six hearts. The Recorder next opens two more Heart Container and access to Dungeon 3. You can get the bait you need there before the next labyrinth.
To the Walkthrough of the second quest. Open second quest on the interactive map.