

With twelve hearts from the previous route you can pick up the Magical Sword on A10. Use the Power Bracelet to move the single rock at the western tip of the arrow-shaped group of rocks. Enter the cave. The old man checks your maximum heart bar; You don’t have to show twelve straight filled hearts. The blade deals more damage than the white sword and noticeably shortens the following Wizzrobe fights.
Open the cemetery entrance on D1
Get medicine, bombs and some before the dungeon Rupees for arrow shooting. Take at least a key with. Blue Gohma requires three successful arrow hits at the end; a few extra Rupees compensate for missed shots. The cheap arrow and shield dealers are in our area Shop overview. If a Like Like has eaten the shield, you can buy a replacement there.
Dungeon 6 is located on D1, a graveyard screen south of the heart container find C1. Play the Recorder to make the hidden stairs appear. No gravestone is pushed aside here like with the Heart Container. Fill your hearts before entering; The dungeon is easier to navigate with a Magical Sword and a blue ring, but Wizzrobe shots remain dangerous.
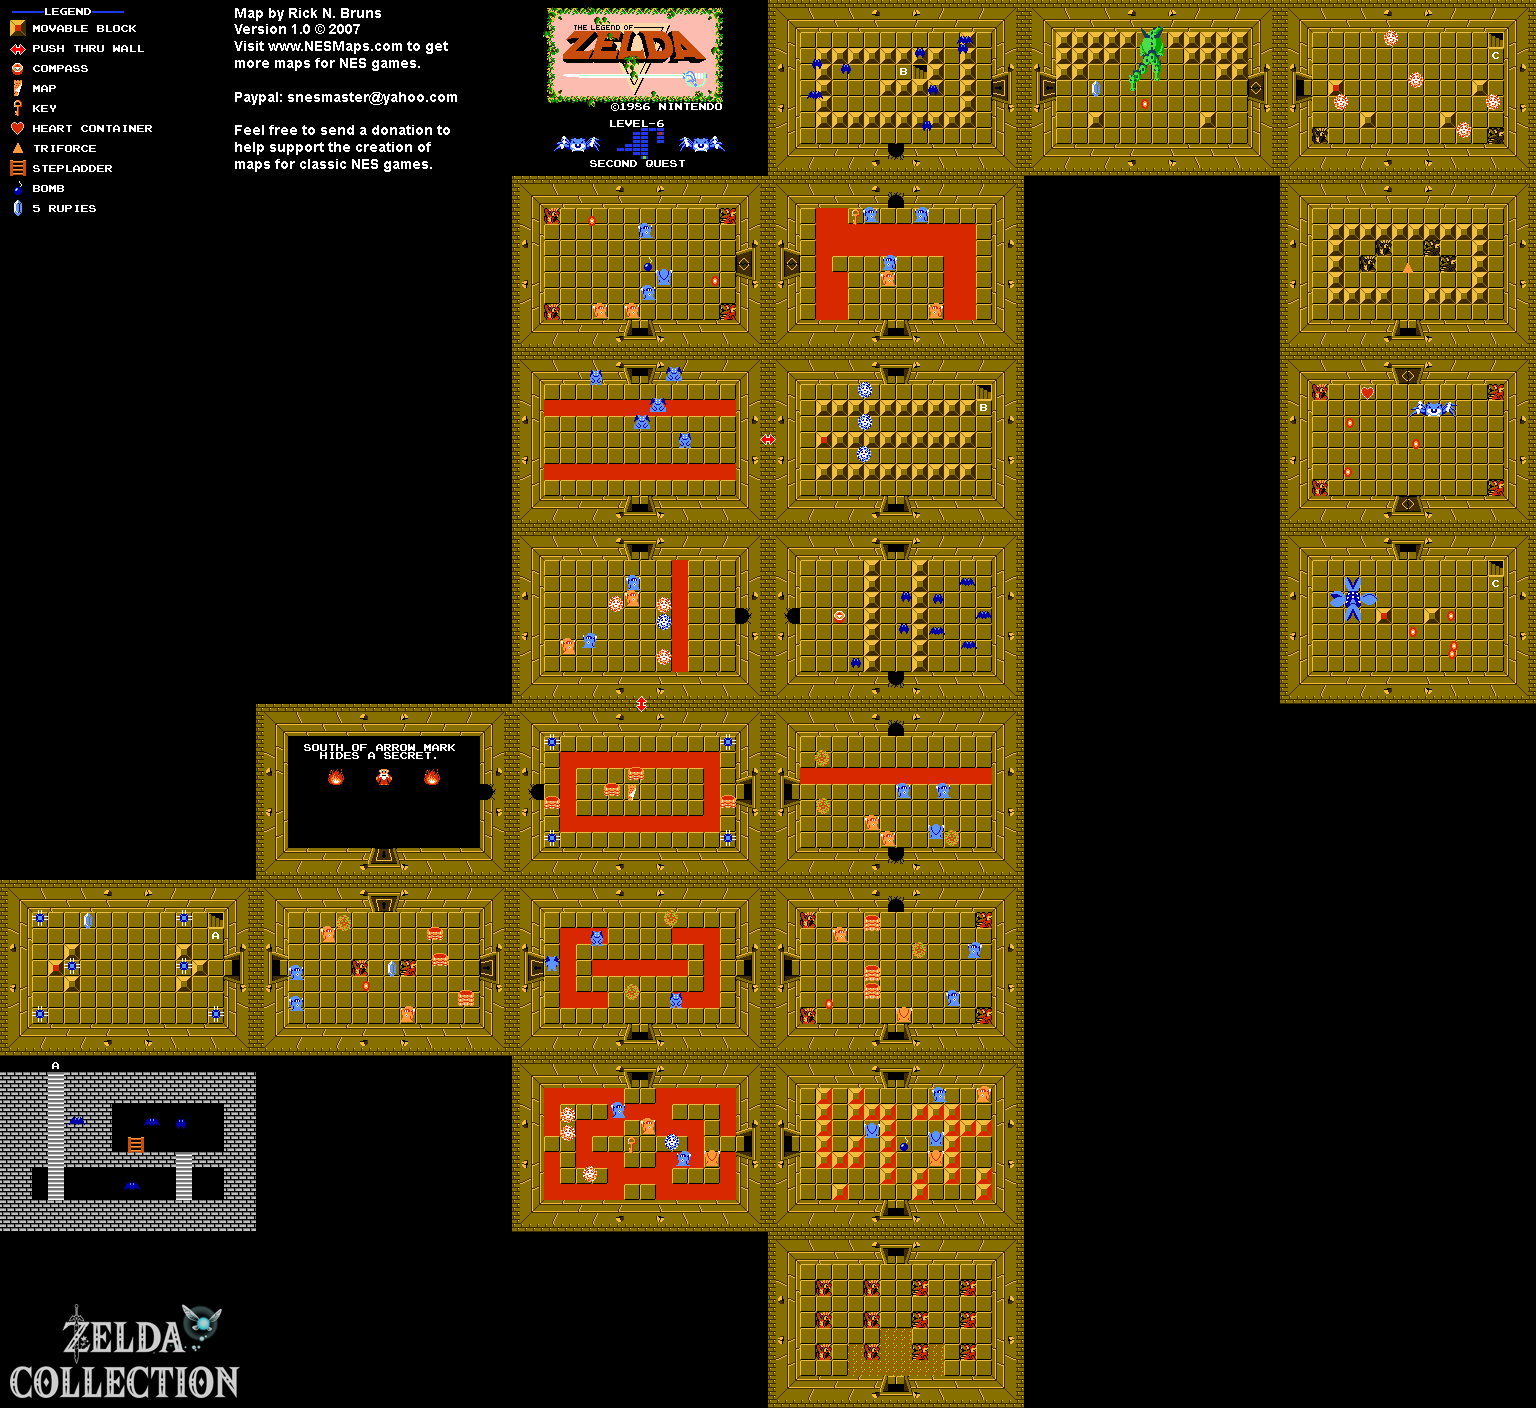
Get the Stepladder first
From the entrance hall, go north twice. Avoid or defeat the Wizzrobes for supplies. Then go three times west. You open the key door on this route with the key you brought with you. In the westernmost room there is a Rupee, spike traps and the hidden entrance to the item cellar. Move the middle block on the left side so that the stairs are visible under the trap on the top right.
Trigger the spike trap by briefly entering its line, and head to the stairs as it slowly returns. In the basement A lies the conductor. It is automatically laid out when crossing narrow areas of water or lava. The find is also necessary for the last heart on the east coast and the later entrance to Dungeon 8.
Return from the basement and go east twice. Go south into the room with the narrow water hole and use the Stepladder to collect it Key a. Return north and go east. If necessary, restore the sword function on a blue bubble. Blow them up North wall this room and go through the hole.
Dungeon Map and Compass
In the room above the bomb hole, go west. Here Like Likes stay between the watering holes. You can use the Stepladder to reach the separate walking paths. Defeat the Like Likes without getting caught and get the Dungeon Map. The shape is reminiscent of a hat; the last section in the east can only be reached via connecting cellars.
Go through the northern false wall of the map room into the Wizzrobe and Bubble room. Open its east wall with a bomb to pick up the Compass in the next room. Return west and go north twice. You can stock up on bombs in the upper bat room. Go east and then south into the room with the blue bubbles. Move the western middle block and use the stairs B. Before you descend, check that your sword is working again.
Through cellars B and C to the boss
After cellar B you are in the northern bat room. Blow them up South wall, get the key behind the enemies and return north. Open the eastern door. There’s someone waiting behind it two-headed Gleeok as an Miniboss. With the Magical Sword, short attack windows are enough instead of spending a long time next to their heads. Defeat him, go east and move the block containing the stairs C exposed.
Red bubbles in the stairwell can lock your sword again. Avoid them if possible. After the cellar you will appear at Manhandla in the eastern dungeon section. The northern exit leads to Gohma; You don’t need to defeat Manhandla for the Triforce Fragment on this route. Use the free moment to go north instead of standing in the middle of their heads with your sword locked.
The blue Gohma opens and closes its eye at fixed intervals. Stand under them, avoid the projectiles and shoot an arrow when the eye is fully open. Three successful hits end the fight. Don’t shoot during the closed phase: it consumes Rupees without doing any damage. Take the Heart Container and go north to the sixth Triforce fragment. This means you have thirteen hearts.
The last overworld heart on the east coast
Return to the start and go right eight screens and up twice to F16. The Stepladder bridges the narrow water hole to the small platform. Collect the Heart Container on it. Your bar increases to fourteen hearts; This means that all five overworld hearts from the second quest have been collected. Next, open Dungeon 7 with the candle. Save at least 50 Rupees so that you don’t have to sacrifice a Heart Container fee.
To the Walkthrough of the second quest. Open second quest on the interactive map.