

On H8, enter the cave in front of Link and take the wooden sword. In the second quest, the enemies in the dungeons are much more dangerous early on; therefore start with full hearts and bombs. A bomb pack of four costs 20 Rupees on E11. From the start you can reach this shop with up, right, up, right, up and right. Enemies can also leave bombs behind. Before the first maze, collect several pieces so that you can open the necessary walls.
Candle and protection from the first dungeon
The blue candle costs 60 Rupees on G7; From the start you go up once and to the left once. It opens bush hiding places and is used in later dark rooms. After a use, you must leave the screen and return before you can use it there again. For a cheaper Magical Shield, go to the merchant cave on E7 and burn the corner bush. The shield costs 90 Rupees there. It helps against projectiles, but doesn’t make you invulnerable to all attacks.
A longer, helpful detour leads to the blue ring on A16. It halves the damage taken and costs 250 Rupees. Buy it as a separate purchase: Ring and other supplies do not fit in a full 255 ruby purse at the same time. In the northeast you reach B16; walk there through the invisible passage of the northern wall to A16. If you can’t pay for the ring until later, the route remains playable. With three hearts, fight carefully and use the fairy springs on E4 and D10 before visiting the dungeon.
From the start, takes you right, four times up and left to the bridge on D8. Cross it and enter the tree on the island. This entrance is the only dungeon entrance that remains in its place from the first quest. Inside, however, a different floor plan awaits you.
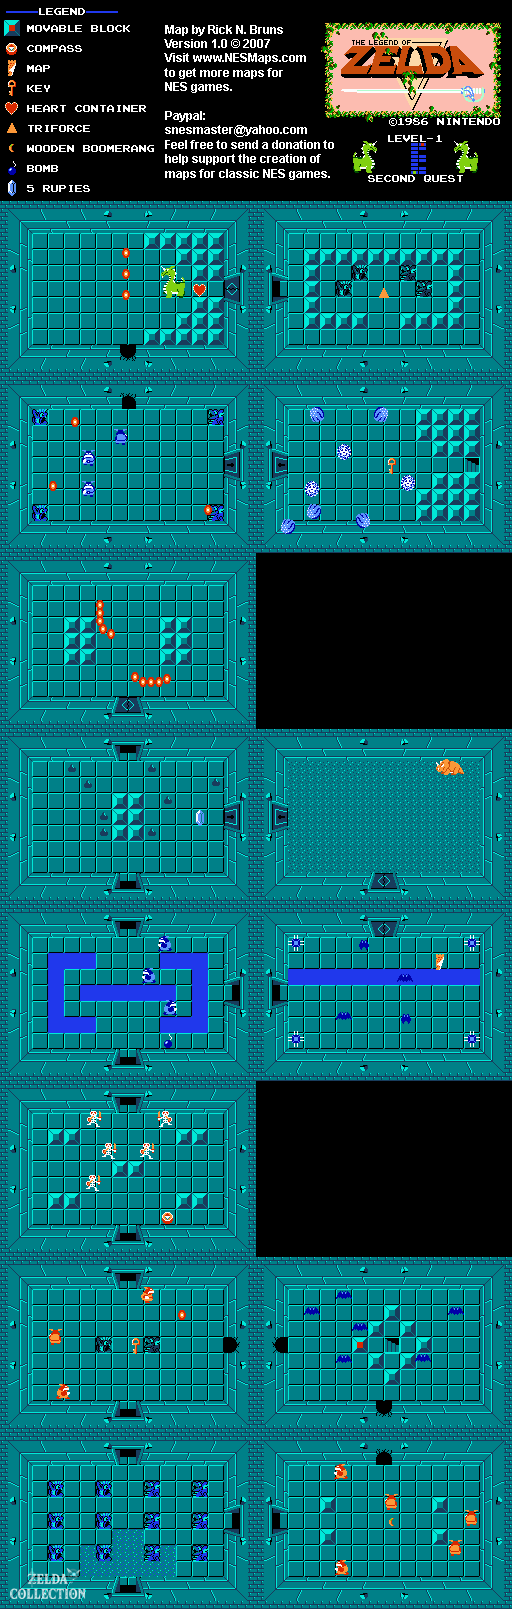
Get the Boomerang and open the north corridor
From the entrance hall, go right. Defeat the Red Goriyas to get the Wooden Boomerang. Keep your distance from their flight paths as you approach. As soon as the Boomerang is yours, you can briefly stun Goriyas and then hit them with the sword. It doesn’t take the fight away from you, but it does give you a safe opening.
Return to the entrance hall and go north. In the room above, red Goriyas and shooting statues await. Defeat the Goriyas and take the key. Save your bombs for the eastern passage, Dodongo and the later wall in front of the boss instead of fighting the Goriyas with them.
Go north to the Stalfos. You shoot sword beams in this round. Don’t stand directly in their line of sight and kill them one after the other so that the Compass appears. Continue north. The blue Goriyas require more hits; stun an enemy, strike and retreat from the other boomerangs. After the fight you will receive bombs. One room further north you clear the small gels and can collect Rupees.
Map and path through the connecting cellar
Exit the gel room to the right. Here Dodongo blocks the way. Place a bomb right in front of his open mouth so he swallows it; repeat the hit. Alternatively, a nearby explosion can stun him, whereupon you kill him with your sword. Afterwards, go south. Wait for the spike traps to kick out and slide back, and collect the Dungeon Map. The spatial shape is reminiscent of an E.
Return north, go left into the gel room, then go south three times into the room where the first key was. Open the east wall with a bomb. Defeat the bats in the room beyond and push the western block to make the stairs appear. The connecting cellar takes you to the separate eastern area of the labyrinth.
After emerging you will find yourself in a room with wallmasters and bubbles. Approach a wall to make the hands appear and move back into the open field. Defeat the Wallmasters without being carried back to the entrance and collect the second key. Wait for a regular sword barrier through a bubble in the middle of the room. Then open the door to the west. You don’t have to defeat the blue Goriyas and four fire statues to continue here: blow up the north wall and go to the boss.
Aquamentus and the first Triforce fragment
Aquamentus stands in the right part of the room and shoots three fireballs in a fan shape to the left. Keep a little distance, let the bullets pass you and then go to the head. Strike briefly and dodge again. With a full heart bar, you can fire sword beams from a distance. Nevertheless, stay mobile as soon as the next shot is announced.
After winning, collect the Heart Container and go right to the first Triforce Fragment. Without a previous trip to the overworld, you now have a maximum of four hearts. The next chapter gets the Graveyard Heart and White Sword before tackling the stronger enemies in Dungeon 2. You can check off the first round of the dungeon using the interactive map.
To the Walkthrough of the second quest. Open second quest on the interactive map.