

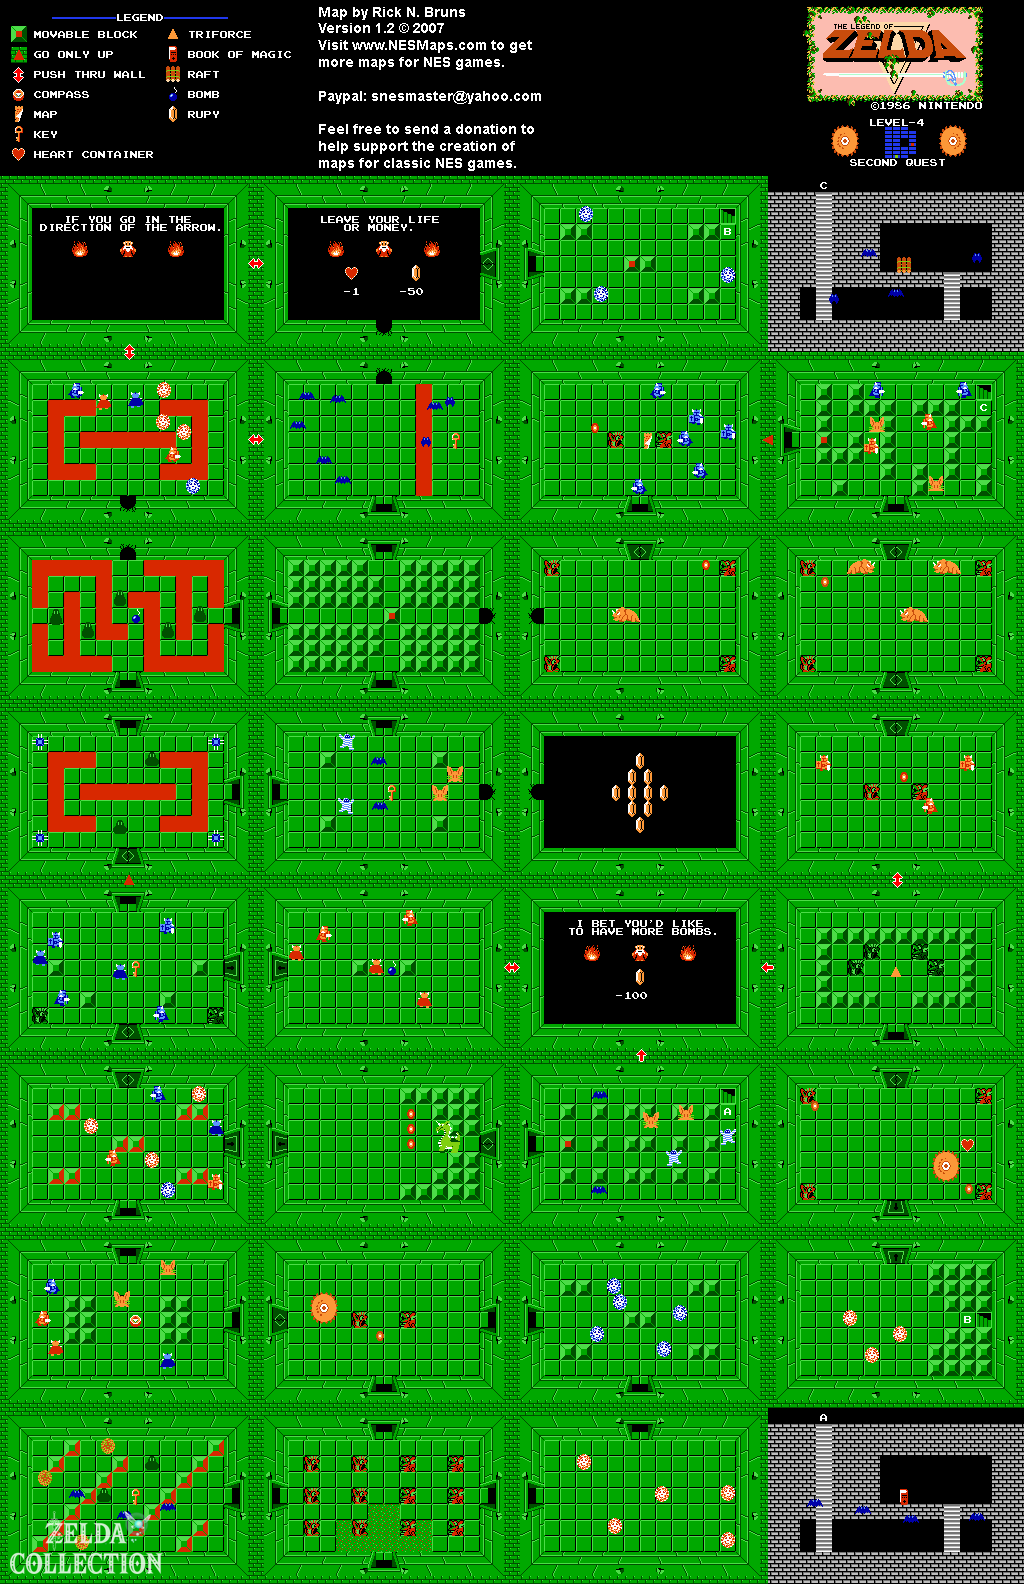
Dungeon 4 is located on B12 in the Lost Hills. Use the Power Bracelet to push away the single eastern rock. The Recorder is used in the labyrinth against Digdogger. Take 150 Rupees, bombs, white blade and medicine with you: For 100 Rupees you get more bomb sites, another 50 are required as a fee on the main path. With the three overworld hearts and three boss hearts collected so far, you have a maximum of nine hearts.
Digdogger and the Book of Magic
First go west, light the room with the candle and defeat the enemies for a key. Return to the entrance hall. Go east to the room with red bubbles and then north to the blue bubbles. Use the blue ones if a red touch locked your sword and go west to Digdogger.
Play the Recorder against the big eye. The little Digdoggers are stopped with the Boomerang and then hit with the sword. After the fight, go west. In the following room, defeat Darknuts and Pols Voices for the Compass. Without a bow, the Pols Voices are tough; Keep your distance between groups of enemies and do not stand between several knights.
To the north is a dark room with darknuts and red bubbles. Light the candle and pass through it to the east. Aquamentus is waiting behind the key door. Attack the head between his volleys of fireballs and then continue east. In the next room, defeat the enemies and push the middle western block. The stairs lead to the Book of Magic. It later adds fire to the wand; You don’t get the staff itself until Dungeon 8.
Twelve bombs and the Dungeon Map
Return from the item cellar and go through the northern false wall to the bomb dealer. Pay 100 Rupees to increase the maximum supply from eight to twelve bombs. Reserve the remaining 50 Rupees for the later fee. Go through the western false wall into the Darknut room and west again. Defeat the blue Darknuts for the next key.
Go north into the room with the spike traps. Lure the traps out in a common line, passing the wall as they slide back to their corners. Go east, defeat the enemies and get the key. In the east wall is a bomb cave with ten Rupees; If necessary, take the money with you and return. Then go north to the block puzzle.
Move the block so that you reach the eastern path and open the eastern wall with a bomb. Defeat the Dodongo and go north. Here blue Darknuts guard the Dungeon Map. Take on one knight at a time. Stand on the sides of the blocks and hit the enemies as they run around the corners. Space is one of the reasons to save the medicine for this section.
The 50 ruby fee and the second Digdogger
From the map room, go south and west back to the block puzzle. Reset the block position by briefly changing rooms if the western path is blocked. Go west, get the Zols’ bomb supply and blow up the north wall. Behind it are Darknuts and Bubbles. Go through the northern false wall to the old man and then through the eastern false wall into the fee room.
Pay 50 Rupees. Do not choose the Heart Container: This decision will permanently take away a place on the heart bar. If you don’t have enough money, you turn around beforehand and collect more Rupees instead of thinking of the loss as a supposed healing fee. After paying, go east to the room with blue bubbles. Restore your sword ability and move the western of the two middle blocks to open the connecting cellar.
After emerging you have to avoid red bubbles. Open the north door and play the Recorder again against the next Digdogger. Stun the small enemies with the Boomerang and kill them with the white sword. Take the Heart Container. You now have ten maximum hearts.
The raft behind the Triforce room
Go north, but don’t take the Triforce Fragment yet. Run past him to the middle of the north wall and hold up. Behind the false wall you defeat the red Darknuts. Go north and kill the three Dodongos. With the expanded bomb supply you have more reserves for this; use the bombs specifically in front of the mouths.
Go north again. Defeat the enemies in the narrow space and move the block at the western entrance. The stairs to the northeast lead to the raft. Get it, return from the basement and go south three times to the Triforce room. Only now do you collect the fourth fragment. The raft is necessary to access Dungeon 5 and first opens the next Heart Container on the east coast.
To the Walkthrough of the second quest. Open second quest on the interactive map.