

With the raft from Dungeon 4 you go to the east coast. From start H8, eight screen changes lead to the right and four up to the bridge on D16. Run onto the dock; the raft automatically goes to the island on C16. In the cave, select Heart Container. This means you have eleven hearts. Drive back to the coast via the jetty.
Buy arrows and go to dungeon island
Before the fifth labyrinth, buy arrows for 80 Rupees, for example in the shop on G16. The bow is only in the next dungeon, but you can shoot immediately after finding it. Each arrow shot costs an additional Rupee. So don’t leave the store with exactly zero Rupees and expect that your arrow purchase will also include free ammunition.
Also take at least one key, medicine and bombs. If your key supply is empty, you can buy one from the Ring Merchant on A16 for 80 Rupees. You can find further offers in the dealer overview. The Magical Sword remains out of reach with eleven hearts; the old man demands twelve maximum hearts. The white blade, the blue ring and, if possible, a magical shield are good preparation for the Wizzrobes of this labyrinth.
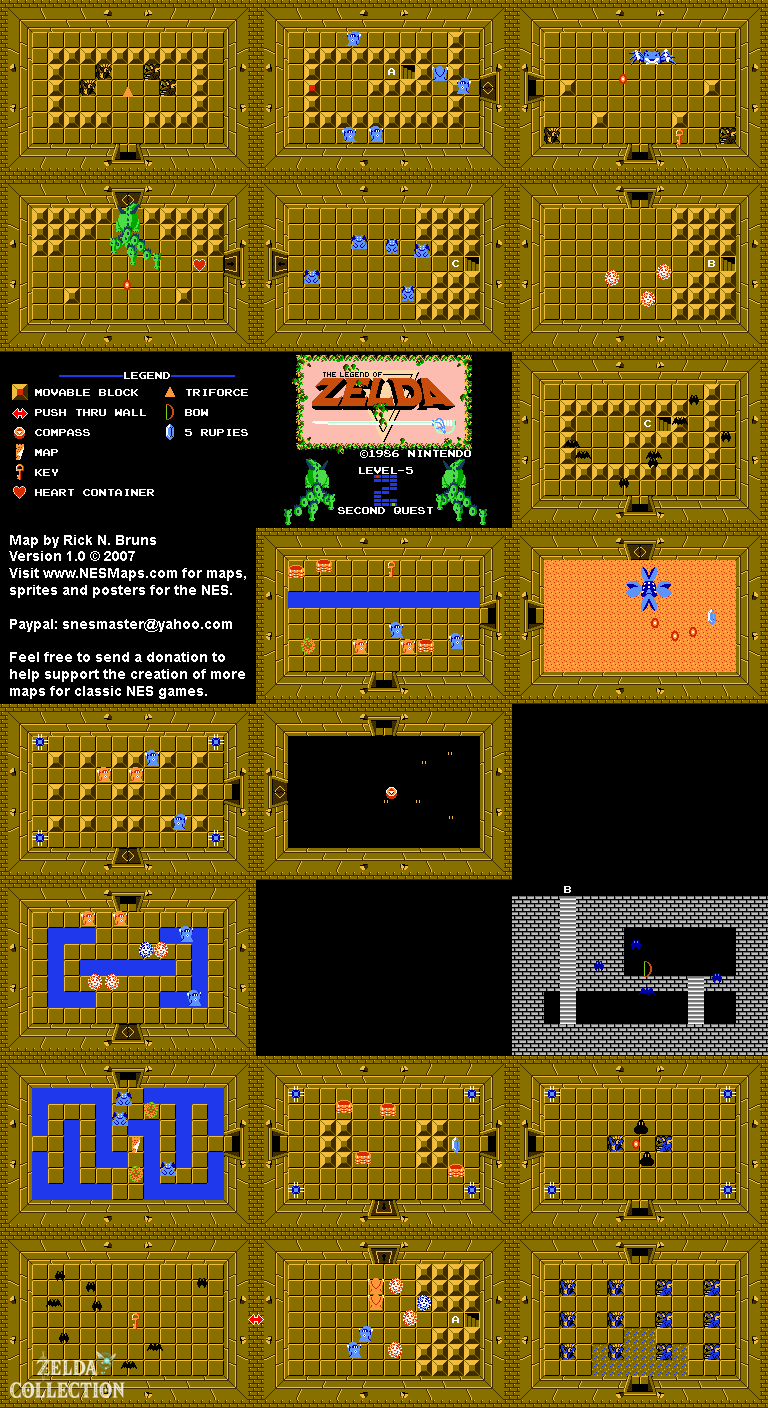
The dungeon is on E6, the island of the fourth labyrinth of the first quest. From the start you go north, twice west and north to the jetty on F6. Run the raft north to the island and enter the entrance.
Through the first cellar to the arch
Go north and light up the dark room. Avoid the spike traps and head west to the Like Likes. Stop them with the Boomerang or fight them from a distance. They can eat your Magical Shield if they grab hold of you. Open the south door. In the next room there are Wizzrobes and red and blue bubbles close together. Avoid their firing paths, pick up a red sword lock on a blue bubble and use the eastern stairs.
The connecting cellar A leads into a room with spirally placed blocks and blue Wizzrobes. Defeat them before pushing the western center block inwards. This opens the eastern exit. Slide from the western side of the room; if you block the wrong entrance, leave the room and reset it.
Wait in the room to the east blue Gohma. You don’t have the bow yet, so go south first. Avoid the red bubbles and climb into the item cellar b down. That’s where it lies bow. Return, go north and stand under Gohma’s eye. Hit it with total three arrows while it is open. After the fight, a key will appear.
card, Compass and second connection
Go west and through Cellar A back to the southern dungeon area. Pass the western false wall there. Light up the room and defeat the bats for another key. Return east and go north to the Like Likes. From there the path leads west into Vire space. Defeat the enemies and their bats to make the Dungeon Map appear. The white blade splits a Vire into Keese; With the Boomerang you can clean up the little bats.
Go north twice through the dangerous Wizzrobe rooms. You don’t have to fight every group to progress. Be especially careful to leave the room with red and blue bubbles with a usable sword. In the upper room, avoid the spike traps and head east. Light up the black ground, defeat the Zols and collect the Compass.
Go north and east. Manhandla blocks the next path. Use bombs to hit multiple heads at once, thereby opening the north exit. In the room above you use the stairs to the connecting cellar C. After emerging, defeat the Vires and open the western door to the final boss.
Gleeok with three heads and twelve hearts
Attack the heads of the three-headed Gleeok with the white sword. With a full bar, sword beams help with the first part of the fight. As soon as you take a hit, switch to short attacks on the neck and retreat to the sides again. Don’t just focus on a head that’s already flying freely: the heads that are still attached will keep the boss alive.
Collect the Heart Container and go north to the fifth Triforce Fragment. Your maximum bar now includes twelve hearts. This makes it worth going to the Magical Sword on A10 before Dungeon 6. In this quest, the blade is under a movable rock, not in the graveyard.
To the Walkthrough of the second quest. Open second quest on the interactive map.