

The seventh dungeon is on G13 in the eastern forest. There are two bushes next to each other in the row of trees. Stand at the right bush to the east and use the candle to the left so that the burns the west of the two bushes. The newly opened access is not yet directly accessible from your site. Go north, west and south again to the other side of the line of trees and enter the stairs.
Take at least 50 Rupees, medicine, the bow with purchased arrows and bombs. You need the Stepladder from Dungeon 6 for the water gaps inside. On our route you have fourteen hearts and the Magical Sword. The interactive map marks the correct screen G13; The bush entrance is not at the old entrance to the eighth dungeon on F14.
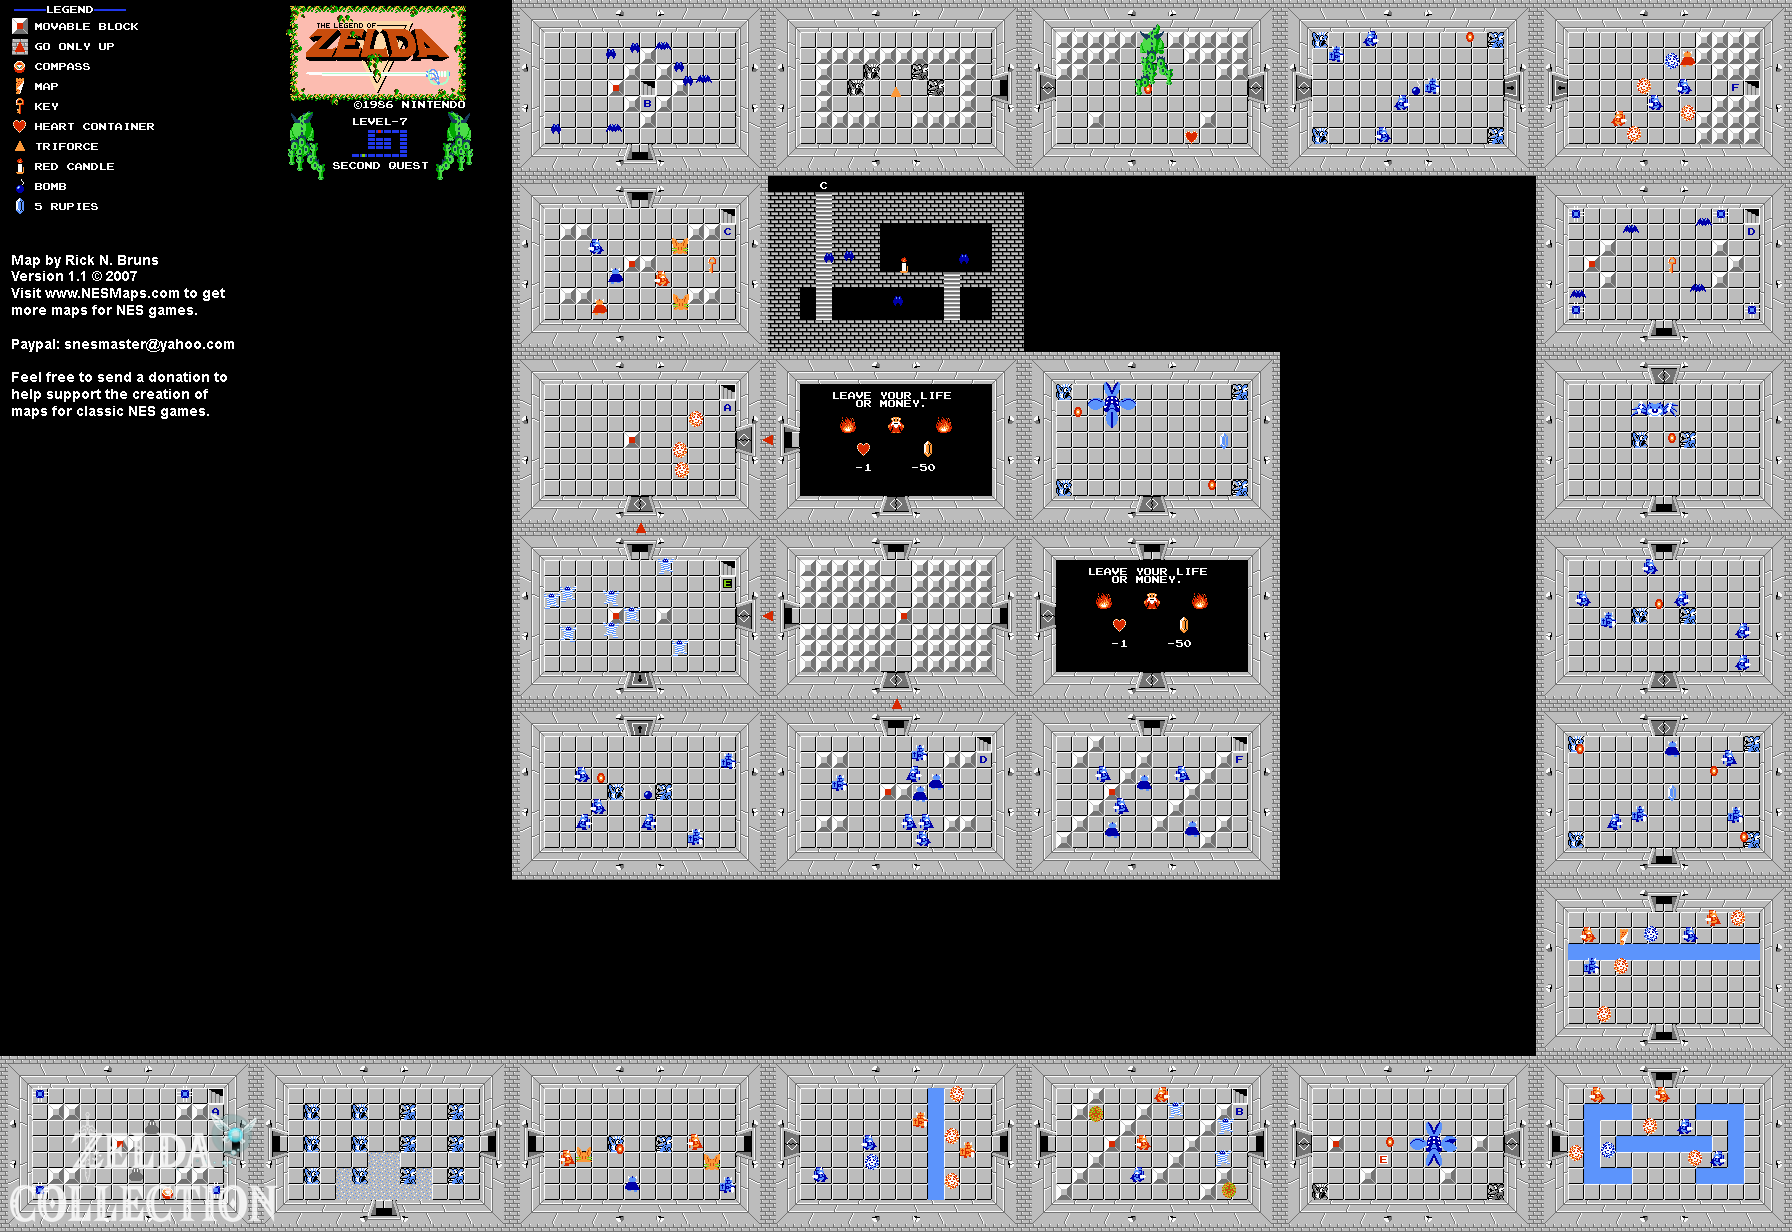
The early detour to the red candle
First go west and get that Compass. The spike traps can be triggered by briefly pretending. Return to the entrance hall and then leave three times to the east. On the way you light up the dark room and avoid darknuts and bubbles. A laid Stepladder can give you a more sheltered place to stand at a gap in the water; Nevertheless, watch out for projectiles and do not enter the gap without thinking when enemies are following closely.
In the eastern room there are Gibdos and Darknuts between blocks. Defeat the vulnerable enemies; You don’t have to and can’t eliminate bubbles with your sword. Then move the western middle block and use the stairs of the connecting cellar B. After emerging, head south. Get the key, defeat Pols Voices and Darknuts and move the western center block. The new staircase C leads to the red candle.
The red candle can be used multiple times on one screen. You no longer have to leave the room after each use. Return from the item cellar, go north and use connection cellar B back to the eastern room of the entrance axis.
Up to the map and Gohma
Go east. Defeat Manhandla to clear the path and move the block for the eastern exit. Light up the next room and head north. Here you have to defeat the Darknuts for the Dungeon Map. First, light up the room, keep an eye on the red bubbles and attack the knights from the side.
Go north into another heavy room with blue Darknuts and shooting statues. Defeat the knights to make the north door open. In the following room you can pass the next group without taking them all out. Go north to blue Gohma. Hit the opened eye three times with arrows and then go north. Get the key, defeat the bats and move the western center block. Staircase D takes you to the inner dungeon area.
Only pay the necessary fee range
After emerging, go north to the block puzzle. Push the block north and go east. In this room, an old man demands 50 Rupees or one Heart Container. Pay 50 Rupees and then go south . This way you can reach the necessary path to the boss with just one fee.
The western branches and the additional northern fee room are detours for fully exploring all rooms, not a requirement for red candle and Triforce fragment. Some stairs there only lead in one direction back to previous rooms. Therefore, take the south path described if you want to complete the labyrinth. A second paid fee room is not necessary for our collection route.
Defeat the Darknuts in the southern room and move the western center block. The connecting cellar F leads to the northeastern section. From there, go west through the room with red bubbles and darknuts. Stay away from the red bubbles so that your sword works before the following competitive battle. In the next room you defeat the blue Darknuts and open the western door to the boss.
Four Head Gleeok
A four-headed Gleeok guards the penultimate dungeon completion. The higher head count means more simultaneous fireballs and later free-flying heads. With a full bar, you can start the fight with sword beams. After a hit, attack the still attached necks from close up. Spread out the punches and dodge sideways instead of letting a flying head back you into a corner.
Use the medicine before another hit defeats you. After the victory you take the Heart Container; Your bar now contains fifteen hearts. Go west to seventh Triforce fragment. For Dungeon 8 you again need a bait, a key as a reserve and 100 Rupees for the second bomb expansion. Get these supplies before the next entry.
To the Walkthrough of the second quest. Open second quest on the interactive map.