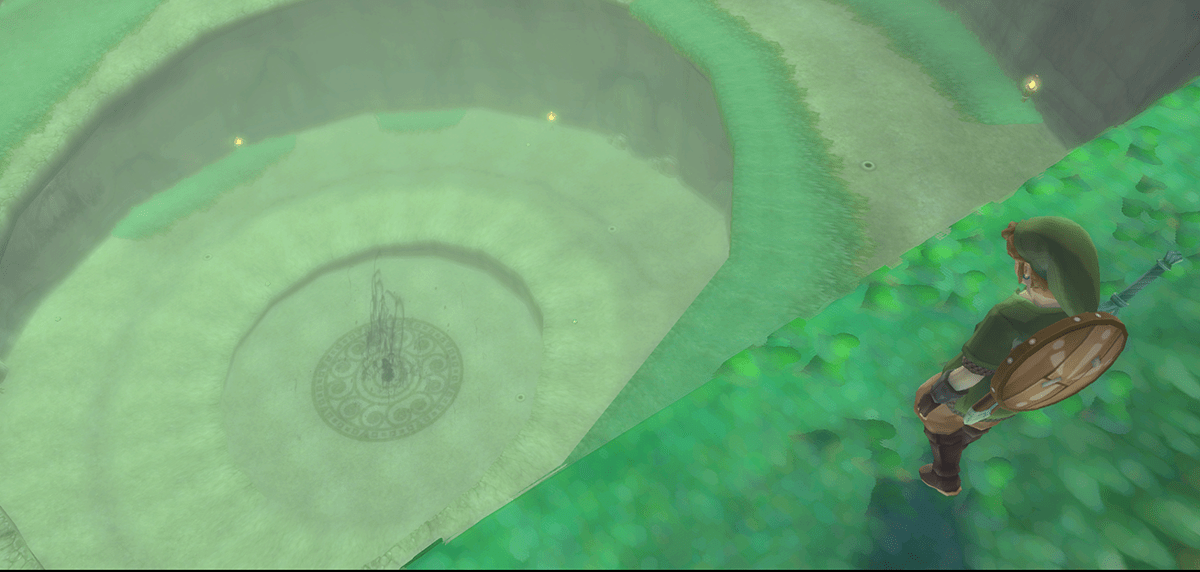

Return to the Sealed Grounds with the Goddess’s Harp. Fight the Imprisoned, learn the Ballad of the Goddess and solve the windmill and Isle of Songs puzzles to learn Farore’s Courage.
Before returning to Faron
After the scene in the Temple of Time, you will find a bird statue nearby that you can use to return to Sky. If you have consistently followed our previous 100% route, you will have already opened the Goddess Chests activated during the first visit to the Lanayru Desert before the Lanayru Mining Facility and collected, among other things, the Heart Medal and the Piece of Heart on Beedle’s island. You therefore do not need to carry out an additional sightseeing flight at this point. If you got straight into this part of the solution, it’s worth taking a look at your map: If you have any Goddess Chests that are still marked, you should open them now, if possible, before the story continues.
Beedle’s shop can also be interesting again if there is a sufficient supply of ruby. All three additional wallets increase your maximum ruby capacity by 300 Rupees each, and further expansions of the Adventure Pouch are also available for sale throughout the game. However, we still do not force hours of ruby farming. The items cannot be missed and will be purchased at the latest when the required Rupees are available through normal 100% gameplay.


Groose follows Link to the Surface
Now fly directly to the green light beam to Faron and choose Sealed Grounds as the landing site. As he falls through the cloud cover, Link experiences a surprise: Groose has followed him. The self-proclaimed rival can hardly believe that a huge world actually exists beneath the Sky. What hits him even harder is the realization that Link has been pursuing Zelda through this dangerous land for a long time and apparently has a lot more to do with her task than Groose previously wanted to admit.
Groose is not initially discouraged by this. He wants to save Zelda himself and runs towards the Temple of the Seal. Before you follow him, you should talk to Gorko. The Goron continues to investigate the secrets of the ancient civilization and this time tells you about striking clusters of blue Blessed Butterfly. It is said that certain old statues and walls respond to music when such butterflies gather near them. Since you have just received the Goddess’s Harp, you can investigate this secret yourself for the first time.
For now, however, let’s go into the Sealed Temple. Follow Groose through the ruins and talk to the old woman.
Play the Goddess’s Harp
The old woman immediately recognizes the Goddess’s Harp and explains to Link how to play the sacred instrument. Unlike many previous Zelda instruments, you don’t have to memorize any set key combinations. Rhythm and consistent movement are crucial. Keep the Goddess’s Harp ready and continuously move the game from side to side. Link generates the individual tones automatically; Your task is to adapt the speed and rhythm of the movement to the specification.
After a short exercise, a glowing circle appears around Link. Now move the Goddess’s Harp in the same rhythm as the light marker moves from side to side. If you carry out the movements cleanly, Fi or the old woman will join in the melody.
Difference in Skyward Sword HD: If you play with motion controls, you swing the right Joy-Con similarly to the Wii Remote in the original. When button control is activated, movement is carried out with the right control stick instead. You don’t have to hit any real notes – the only important thing is that your lateral movement follows the given rhythm.
Learn the Ballad of the Goddess
After you have successfully completed the introduction, you will learn the Ballad of the Goddess. This is the first full song that Link can use with the Goddess’s Harp. The melody has a special meaning for the residents of Skyloft and at the same time contains a hidden clue to the way forward.
By playing the hymn, a large stone Gate appears in the temple behind Link. It is the Gate of Time through which Zelda and Impa disappeared in the past. However, Link can’t activate it yet. The Goddess Sword does not have enough force to fully open the Gate. Before the old woman can explain in more detail how Link is supposed to change that, a huge shock shakes the entire temple.


Boss: The Imprisoned – first fight
Leave the temple through the exit to the large crater. The Cloud Barrier in the center of the grove breaks open and the huge creature that Link has seen several times in visions rises from the ground: The Imprisoned. His only goal is to walk up the spiral path to Sealed Temple. If the monster reaches the top level, the battle is lost. On the left edge of the screen or on the map you can see how far The Imprisoned has already come.
The classic strategy provided by the game is to first destroy his toes. There are several gray toes on each foot, including one on the back. Approach carefully and attack them with quick sword strikes. Once a toe is destroyed, The Imprisoned stomps violently, creating a red blast wave. Therefore, move away immediately after your hits or jump over the shock wave. A round punch can catch multiple toes at once, but carries a higher risk of being hit by a stomper.
If you destroy all the toes on both feet, you lose The Imprisoned balance and falls backwards. Immediately run to his head. The large seal stone is on his forehead. Hit him hard Upstrokes deeper into the head. After several hits it depends The Imprisoned gets up again, crawls a short distance on its stomach and then regenerates all the toes. With each repetition it moves a little faster, which is why you should use the air currents at the edge of the crater cleverly. Open the above one of the air ducts Sailcloth and let yourself be carried to a higher level when you need to overtake your opponent.
Quick alternative: jump directly on the head
You don’t necessarily have to destroy the toes. A much faster, but slightly riskier method is to use one of the air currents to get to a level above the Imprisoned and drop you from there directly onto his head. If you land close enough to the seal stone, you can immediately perform several upward blows and hit the stone deeper without having to knock your opponent over first.
The method also works for the first fight and can shorten the fight significantly. Don’t stay on his head for too long, though, as The Imprisoned can shake Link off. For players experiencing combat for the first time, the toe strategy is usually easier to understand; experienced players can save a lot of time by jumping on the head.
Reseal the Imprisoned
Overall you have to get the seal stone three times drive into the Imprisoned’s forehead. After the third successful pass, the monster loses its strength and is pulled back into the ground. The seal stone then appears again in the center of the crater.
Jump or slide down as quickly as possible. Stand in front of the stone and charge a Skyward Strike. Hit the Cloud Barrier with it. You then have to trace the displayed triangular symbol with directed sword movements. Follow the glowing lines one after the other. Once the triangle is complete, the Cloud Barrier is reinforced and The Imprisoned disappears underground again.
Renew
Difference in Skyward Sword HD: The boss fight has not been changed in terms of gameplay. With button control, however, the necessary blow directions are entered via the right control stick, which means that tracing the seal and the targeted upward blows can have a significantly different effect than with Wii MotionPlus or Joy-Con movement control.


The three divine flames
After the fight, return to the Sealed Temple. The old woman now explains in more detail why the Gate of Time cannot yet be activated. The Goddess Sword must be strengthened with the power of three divine flames. Only when Link has found all three will his blade have enough power to fully activate the Gate and follow Zelda through time.
Groose listens to the conversation and finally has to realize that he is not the great savior in this adventure that he previously thought he was. Disappointed, he withdraws. However, his story by no means ends there.
Summon Gossip Stones with the Goddess’s Harp
Then leave the temple through the western exit and go to Gorko again. Several blue Blessed Butterfly are buzzing near him. Stand between the butterflies and play a few notes on the Goddess’s Harp. After a few moments, a speaking statue or a Gossip Stone shoots out of the ground.
From now on you will find such positions in numerous areas. A group of conspicuously concentrated Blessed Butterfly is almost always an indication that the Lyra can activate a hidden function here. Gossip Stones give you clues to secrets and also leave behind a random treasure when they first appear. Therefore, play the Goddess’s Harp whenever you notice an unusually large collection of blue butterflies.
Piece of Heart on the Goddess Wall
For our 100% route you should not leave the Sealed Grounds yet. After you show Gorko the Gossip Stone to the first group Blessed Butterfly, he can continue his research in the area behind the temple. Go to the corresponding back exit of the Temple of the Seal and look again for a group Blessed Butterfly on a rock wall.
Play the Goddess’s Harp near her. This time it is not a stone that appears, but a glowing one Goddess Wall. Then talk to Gorko. He describes a symbol from his old notes to you. Stand in front of the wall, load your sword with one Skyward Strike and use the tip of the sword to draw the symbol he described on the glowing surface.
Depending on the clue, Gorko can mean, for example, a heart, a circle, a Rupee or another symbol. When your drawing is recognized, the corresponding objects will appear on the wall. Gorko is excited by the proof of his theory and gives Link a Piece of Heart for his help. If you don’t draw the symbol cleanly enough, nothing is lost. The wall regenerates its power after some time and can be used again.
You can also find all other Locations in our guide to all Pieces of Heart in Skyward Sword.
Back to Skyloft – now many Side Quests
are opening
After the Sealed Grounds has been completely processed, you return to the Sky via the bird statue and fly to Skyloft. After the first victory over the Imprisoned, several new options are unlocked here. For a 100% route, it is therefore worth not just following the main quest straight away. We connect the new Side Quests together in such a way that as few additional day/night changes and flights as possible are necessary.
Buy the Sacred Shield
Your first route leads to the bazaar. The equipment vendor is now offering the Sacred Shield for 500 Rupees. The high price is worth it: unlike the wooden and Iron Shield, this shield is protected against both fire and electrical attacks. Additionally, its durability automatically regenerates if you don’t let it get damaged for a while.
Its disadvantage is the initially relatively low maximum durability. If he is hit too often within a short period of time, the Sacred Shield can also break. It can later be improved at Gondo into much more robust versions. Even in its basic form, the shield is still an excellent choice for the coming areas.
If you’ve followed our previous route with the Gratitude Crystals, your wallet should be big enough by now to easily carry the prize. If you are still missing Rupees, you do not have to force the purchase through artificial farming.
Improve Hook Beetle to Quick Beetle
Then visit Gondo and check the materials you have collected. After thoroughly exploring Lanayru, you should have several Ancient Flowers. If there are also enough Hornet Larvae and a Golden Skull, you can upgrade your Hook Beetle to the Quick Beetle.
The higher flight speed initially only seems like an improvement in comfort, but it is extremely useful on a 100% route. The Beetle will reach more distant switches and treasure items more easily before its maximum flight time ends. If you are missing a rare material, we will initially leave the upgrade open; it is unmissable.
You can also find all the materials required for later levels in our guide to upgrade at Gondo.
Buy the first Stamina Potion for Fledge
A new Stamina Potion has been sold at the potion stand since the completion of the Lanayru Mining Facility. Buy a copy and keep it in your Adventure Pouch. We need it for a Side Quest in the Knight Academy. The potion replenishes Link’s stamina and slows down its consumption for a short time, but the most important thing for our route at the moment is that Fledge needs exactly this potion.
Ask Gaepora about the Ballad of the Goddess
Leave the bazaar and go to the Knight Academy. On the upper floor behind the big door is Gaepora’s room. Speak up Zelda’s Father and ask him about the words to the hymn that Zelda sang during the Cloud Bird ritual. Gaepora remembers two important passages. The crucial clue speaks of two circling wings, which are supposed to show the way to the Light Tower.
This refers to the two large windmills on Skyloft. If both are correctly aligned with the Light Tower, a new path should open. So we know our next main goal. Before we deal with that, however, let’s use the Knight School for several 100% side quests.
Help Fledge train
Go to your room and sleep until night. Then enter the room next to Fledge. You catch your rather shy classmate secretly doing strength training. He wants to become stronger and more self-confident, but has little stamina and can only do a few exercises.
Talk to him and give him the previously purchased Stamina Potion. Fledge thanks him and continues his training motivated. There is no immediate reward yet. This Side Quest spans several later stages of the game. After another large dungeon he needs a second Stamina Potion, and it’s not until much later that you get his five Gratitude Crystals and unlock a mini-game with another Piece of Heart.
However, the first potion can only be handed over now or from this point onwards, which is why we are already starting the quest.
The mysterious voice from the toilet
Stay at night and go to the toilet on the ground floor of the Knight Academy. From the locked room you hear an eerie voice urgently demanding paper. Try to open the door and listen to the conversation. There’s nothing more you can do this night.
Then sleep until morning. In the hallway of the Knight Academy you will find Cawlin. He gives you a love letter and asks you to give it to Karane. He makes it expressly clear that the letter should under no circumstances end up as toilet paper.
Cawlin’s love letter – two possible paths
This Side Quest has two different exits, but both are equivalent for 100% progress. In both cases, you end up with five Gratitude Crystals, and there is no exclusive item that is permanently lost due to the other choice.
For our route we recommend actually delivering the letter to Karane. You can find them in the classroom during the day. She reads Cawlin’s message, but reveals that her feelings are actually for Pipit. Then go to the upper floor and talk to Pipit. When he finds out about Cawlin’s love letter, he finally realizes that he himself has feelings for Karane. Return to the classroom. In the following scene, Pipit confesses his love for her while Cawlin runs away disappointed. As a thank you, you will receive five Gems of Kindness.
Alternatively, you can hand the letter in the toilet at night. Report what you did to Cawlin the following morning and then sleep again until night. In Groose’s room you later find Cawlin sleeping while the ghostly hand caresses him lovingly. You will also get five Gratitude Crystals this way. You can only experience one of the two outcomes in a save game.
You can also find a complete overview of all Side Quests and crystals in our guide to all gems of quality.
Complete Peatrice’s Side Quest
If you have regularly spoken to Peatrice at the item management during our previous bazaar visits, her personal subplot should have developed far enough by now. Her dialogue changes with each passing day until she finally sees Link very clearly as her secret admirer.
Speak to her father Pico in Peatrice’s house at night. After you have already approached him once for an introduction, he will later talk about his daughter’s unwanted admirer and ask you to get rid of the young man. Return to item management during the day. Peatrice invites Link to her house the following night.
At this meeting you can decide whether Link returns her feelings or rejects her. If you answer her questions in the affirmative, you will receive the five Gratitude Crystals directly from Peatrice. If you reject her feelings, you will speak to Pico again the following night and receive the five jewels from him instead. Here too, both paths to 100% progress are completely equivalent.
If Peatrice’s dialog isn’t advanced enough for you, you don’t have to artificially skip numerous days. Just talk to her every time you visit the bazaar; The quest will be completed in our route at the latest during the next suitable stop.
Turn the first windmill to the Light Tower
Now return to the actual main task. From the square in front of the Knight Academy you will find the first large windmill on the western or central side of Skyloft. There is a small wind turbine on the back. Aim the Magic Jug at it and continuously blow against the wings. This causes the entire windmill to start rotating slowly.
Align it so that its front faces exactly towards the Light Tower in the large village square. As soon as the correct position is reached, the Crystal Ball or mechanism on the windmill reacts and shows you that it has been correctly aligned.
The second windmill is missing the propeller
The second windmill is on the eastern side of Skyloft. As soon as you approach it, it quickly becomes clear why it cannot simply be turned like the first one: the small wind turbine or the wind turbine propeller on the back is completely missing.
Talk to Gelan nearby. He explains that the propeller fell off the island into the Surface a long time ago. If Link could somehow bring him back, Gelan would be able to repair the windmill.
Repair Scrapper with an Ancient Flower
Visit Gondo in the bazaar. He remembers his old transport robot Scrapper. The machine can carry items from the Surface to Skyloft, but it has been broken for a long time. For the repair, Gondo requires a Ancient Flower.
If you followed our full route through the Lanayru Mine and Lanayru Desert, you should have several Ancient Flowers. Give a copy to Gondo. He repairs Scrapper and brings the robot back to life. Fi then adds the missing propeller to the Dowsing. From now on, Scrapper will be available whenever Link needs to transport a large object from the Surface to Heaven.


Find the wind turbine propeller on Eldin Volcano
Leave Skyloft and fly through the red Column of Light to Eldin. Select the bird statue right in front of the entrance to Earth Temple. From there you go west to the sand slope, where you already looked for a key fragment during your first volcano visit.
Slide down the slope. The sought-after wind turbine propeller is clearly visible near the then overturned Bokoblin observation tower. Approach the object. Fi confirms the find and summons Scrapper. The transport robot picks up the heavy propeller and flies back to the Sky independently.
Go to the next bird statue and return to the sky as well. As soon as you approach Skyloft, Link will automatically land at the broken windmill. Scrapper sets down the propeller and Gelan repairs the mechanism.
Align the second windmill
Pull out the Gust Bellows and blow on the newly assembled wind turbine. Turn the windmill until it is directly aligned with the Light Tower. As soon as the position is correct, both windmills begin to react together. A previously hidden altar rises from the ground on the Light Tower.
This means that the main route to the Thunderhead is basically open. For a real 100% route, we use the current stay in Skyloft for several tasks before we play the anthem on the tower.
Clean Pipit’s house with the Gust Bellows
Go to Pipit’s house in the eastern residential area. His mother complains about the enormous amount of dust that has accumulated throughout the building. Since Link now has the Gust Bellows, he can take over the cleaning.
Really blow the dust away everywhere. It’s not enough to just clean the floor. Dust lies on the beds, furniture, shelves, tables, window sills and sometimes even on small objects along the walls. Work your way systematically through the room and direct the air flow into the corners. As soon as the house is completely clean, the game automatically ends the task or the mother speaks to Link.
As a reward you will get 20 Rupees and five Gratitude Crystals. On subsequent visits you can clean the house again and earn more Rupees, but only the first reward with the five jewels is crucial for 100% progress.
Batreaux’s rewards at 30 and 40 jewels
If you followed our previous 100% route, you had already collected a large number of gems before this section. Through Pipit’s house, Cawlin’s love letter and possibly Peatrice’s Side Quest you should have reached the next important thresholds at Batreaux.
At total 30 Gratitude Crystals receives link the Big Wallet, which alone already has 1,000 Rupees can accommodate. Additionally, a chest appears with the Cursed Medal. This increases the probability Rupees and treasures, however, has a significant disadvantage: as long as they are in the Adventure Pouch you cannot use the other items in the bag. Therefore, after collecting them, store them at Peatrice first if you do not want to specifically use their effect.
With 40 Jewels, Batreaux will also give you a Gold Rupee worth 300 Rupees. The larger wallet is particularly practical, as expensive items such as the Sacred Shield and the later bag expansions can now be easily paid for.
You can also find all reward levels in our guide to wallets and additional bags as well as in the Gratitude Crystals guide.
Lumpy Pumpkin task 2: Carrying pumpkins
Before we use the new lyre on the Light Tower, we fly to Pumpkin Landing. If you followed our previous route, you have already brought the hot pumpkin soup to the sword master, but the innkeeper’s second order may still be open. Since completing Earth Temple, you can help out with the pumpkin harvest.
Talk to Kina in the pumpkin patch. Link must carry five pumpkins to storage at the same time without the stack tipping over. Walk slowly and pay close attention to which way the pumpkins lean. If they start to tip to the right, move Link slightly to the right until the stack stabilizes again; If they lean to the left, correct in the other direction. Changing direction too quickly makes the stack uncontrollable. With calm, small corrections you will reach the camp much more reliably than with fast running.
Lumpy Pumpkin task 3: Performing with the Goddess’s Harp
After the pumpkins have been safely delivered, you enter the Lumpy Pumpkin and sleep in one of the beds until night. Since Link now has the Goddess’s Harp, the host’s third and final order is available. Kina sings for the guests in the evening and Link is supposed to accompany her with the Goddess’s Harp.
During the performance, two audience members move their arms to the rhythm of the music. Orient yourself to her movements and swing the Goddess’s Harp evenly from left to right and back again. If your arms move slowly, you play correspondingly slowly; If the guests accelerate, you must also accelerate your movement. If the spectators pause briefly in between, you are allowed to play freely, but you should immediately get back into the rhythm as soon as their arms start swinging again.
The performance doesn’t have to be perfect. As long as you don’t get completely out of step, the innkeeper will recognize the work as complete.
Piece of Heart for the completed Lumpy Pumpkin tasks
After the successful performance, Link’s debt for the destroyed chandelier is finally settled. As an additional reward you will receive another Piece of Heart. This completes the Lumpy Pumpkin complete series of tasks for this part of the game.
Later you can perform together with Kina again at night and earn Rupees depending on your performance, but there is no other unique collectible for this.


Play the Anthem at the Light Tower
After completing the Side Quests, return to the large village square and climb the Light Tower. Thanks to the correctly aligned windmills, an altar has now appeared here. Stand on the glowing surface and pull the Goddess’s Harp.
Play the anthem to the rhythm of the light movement. If you perform the lateral movements correctly, Fi will join in the melody. The tower then realigns itself and sends a massive beam of light towards the huge dark Thunderhead to the northwest Sky. The impenetrable wall of clouds opens at the point hit and forms a safe passage.
Jump on your Loftwing and follow the beam of light into the Thunderhead.
Enter the Thunderhead
Inside the Thunderhead, the atmosphere changes suddenly. The sky is dark and several previously unknown flying opponents are patrolling between the islands. If they pursue Link, you can take them out with a targeted attack on their sensitive tail. However, you don’t have to deal with every opponent to get to Isle of Songs.
Follow the blue beam of light instead. It leads you to a group of islands with a high stone tower: the Isle of Songs.
Goddess Chest on the Isle of Songs – 300 Rupees
Before you tackle the big bridge puzzle, you should search the outside area of the Isle of Songs. A Goddess Chest has already been unlocked here through one of the Goddess Cubes activated earlier in Eldin. It stands on the lower outer ring or on the side of the island.
Open it and you will get a Golden Rupee worth 300 Rupees. This chest was previously inaccessible because you could only enter the Stormcloud after activating the Light Tower. This means that this long-reserved reward from our previous Eldin route has finally been collected.
You can find all other chests and dice in our guide to all Goddess Cubes.
The bridge puzzle of the Isle of Songs
Now land in the large circular courtyard in front of the tower. There are three sections of the bridge missing between your platform and the actual building. Three concentric circular paths run around the courtyard. On each track there is a pedestal that is connected to one of the three bridge fragments. If you press the large lever in the middle, all three bases basically rotate together clockwise.
Next to it is a control stone with three crystals. By hitting one of the crystals, barriers will be deployed at certain positions. If a base hits such a barrier while rotating, it will stop while the other bases continue their movement. This is exactly how you can align the three initially offset bridge fragments to each other piece by piece.
Quick solution to the bridge puzzle
If you haven’t changed the puzzle yet, you can use a fixed solution. First turn the central mechanism seven notches clockwise. Then hit the right Crystal Ball on the control stone. Turn the large lever another six notches until two or finally the three relevant bases line up with each other.
Then activate it upper Crystal Ball and turn the central mechanism precisely a detent further. Then hit it again right Crystal Ball. Now you can roughly see the central mechanism nine detents move until all three bridge pieces are completely aligned with the tower building.
If you have already experimented with levers and crystals several times before reading these instructions, the detents mentioned may no longer correspond to your starting position. However, the basic principle always remains the same: use the barriers to hold individual bases until all three bridge parts form a straight line. Then you rotate the entire aligned row together up to the tower.
Learning Farore’s Courage
Cross the entire bridge. In the end there is only a low shaft leading into the tower, which Link has to crawl through. There is a bird statue behind it where you can save. Then follow the short corridor to the large bird symbol.
Stand in front of it, fully charge the Goddess Sword with a Skyward Strike and hit the crest. A large statue of the goddess rises from the ground and Fi delivers a new message to Link. In order to reach the three divine flames, he must first pass three tests and thereby obtain the divine treasures.
As a key to the first test, Link receives the new song Farore’s Courage. Fi simultaneously expands the Dowsing with the Trial Gate. The Gate you are looking for is located in Faron Woods and leads Link to the first so-called Silent Realm exam.


Restore Fun Fun Island
By repairing Scrapper and opening the Thunderhead, another important Side Quest is now fully solvable. Before you fly to Faron Woods for Farore’s exam, you should take a short detour to Fun Fun Island in the southwestern Sky.
Talk to Dodoh. He is unusually depressed because his colorful roulette wheel fell off the island and disappeared into the Surface. Without the wheel, he can no longer play his popular parachute mini-game. Fi includes the lost object as a new target in the Dowsing.
Recover Dodoh’s Party Wheel in Lanayru Desert
Fly through the yellow beam of light to Lanayru and select the desert entrance as the landing site. You already saw the bike you were looking for during our first visit, but you weren’t able to transport it back then.
Activate the nearby Timeshift Stone under the boulders. This causes the old tendrils to grow on the rock face again. Climb up and follow the narrow ledge. At one point you have to shimmy along the side of the edge. On the platform behind lies the colorful roulette wheel.
Examine it and call Scrapper. The robot takes the bike into the Sky. Return to the bird statue and fly to Fun Fun Island again. Scrapper automatically delivers the find to Dodoh.
Receive Five Gratitude Crystals from Dodoh
Dodoh can finally reopen his shop and thanks Link with five gems of kindness. If you have completed all of the Side Quests that we have described so far, your jewel level will increase significantly again. The next big Batreaux reward awaits at 50 gems, which is why each of these early bundles is important for the eventual Giant Wallet.
Piece of Heart in the roulette mini game
The returned wheel also unlocks Dodoh’s parachute mini-game. For a real 100% route you should get the corresponding Piece of Heart right now. Dodoh shoots Link high into the air and you have to fly through five rings as he falls. Each ring you fly through increases the multiplier, while the large dodo balls destroy the bonus when you touch them.
For the main prize you have to go through all five rings fly, do not touch any ball and then on the colorfully marked one 50-rupee field of the rotating roulette wheel. With all five rings you have a tenfold multiplier, giving you 500Rupees. With the first perfect pass, Dodoh gives you an additional one Piece of Heart.
The hardest part is landing. Once you have passed the fifth ring, observe the position of the 50-rupee field and take into account that the disc will continue to rotate significantly during the rest of the fall. Avoid hectic corrections close to the bottom; small movements are much more precise.
Difference in Skyward Sword HD: The parachute mini-game can be played without motion controls when the button controls are activated. If you have problems with fine control with the Joy-Con, the right stick is often the more comfortable option for this competition.
Continue to the test of courage in Faron Woods
Farore’s courage now leads you back to the Faron Woods. There you can use the Dowsing to track down the first Trial Gate. After playing the anthem in the correct location, Link enters the Silent Realm and must collect 15 Tears of Farores without his usual equipment while powerful guards guard the area.
As a reward for this first test, Link receives the Water Dragon’s Scale. It enables diving and not only opens the way to Lake Floria, but also several previously unreachable collectibles in Skyloft and Faron. That’s exactly where we continue our 100% walkthrough in the next section.