

Our 100% walkthrough for The Legend of Zelda: The Minish Cap begins with the Minish Festival, leads through the Tyloria Forest to the Forest Minish Village and ends in the first dungeon, the Deepwood Shrine. We don’t just follow the main path, but from the start we take everything that is already accessible with us. By the end of this chapter we will collect four of the 44 Pieces of Heart, all the important treasures of the Deepwood Shrine, the Gust Jar, the earth element and finally the bombs. In this way we avoid unnecessary backtracking later and build up a complete score step by step.
Link’s House and the Minish Festival
After the short intro, Link wakes up in his room. Go down the stairs and through the right door. Smith and Princess Zelda are waiting there. Smith has made a sword for the winner of the sword fighting tournament and Zelda wants to visit the Minish Festival in Hyrule Town with Link. Before you leave the house, open the Treasure Chest and take the 20 Rupees with you. Every Rupee is helpful, especially at the beginning of the game.


Follow Zelda north. At the festival she visits several stands and finally takes part in a competition. As a prize she chooses the Small Shield and gives it to Link. Then continue north. A Deku dealer blocks the path and spits Deku nuts at you. Hold up the shield at the right moment to knock the nut back. The dealer clears the way and you can continue to Hyrule Castle together with Zelda.
Vaati and the broken Minish sword
In the castle, Link hands over Smith’s sword. Shortly afterwards, Vaati appears, the winner of the sword fighting tournament. However, he is not interested in the prize, but in the mysterious chest sealed by the sacred Minish sword. Vaati destroys the blade and opens the chest, releasing the monsters trapped inside. When Zelda tries to stop him, he turns her to stone.


After the sequence, Link wakes up again in the castle. King Daltus and Smith explain that only the Minish can repair the broken sword. Since adults can’t see the Minish, Link has to take on the task. You will receive the Sword of Smith, the Broken Minish Sword and the Map of Hyrule. From now on you can use the sword freely.
On the way to Tyloria Forest
Leave the castle south and go to the Northern Plains of Hyrule. In the southeast there are small trees in the way. Cut them away with the new sword and follow the path east or south. Through the Eastern Hills and over the bridges you will finally reach Minish Woods. The path through the forest is initially largely predetermined. Run east, then south and follow the route until a short sequence is triggered: A strange green hat calls for help.


Piece of Heart #1 and Ezelo
After the cry for help sequence, we don’t immediately go back to the hat. First follow the path towards the Deepwood Shrine and take the Piece of Heart #1 lying around. This Piece of Heart is sometimes mentioned again later in older versions of the solution – but this is the same find. If we collect it now, we don’t need to return for this Piece of Heart.
Then go back to the green hat and defeat the two Octoroks. She introduces herself as Ezelo and accompanies Link from then on. After a few meters he gives up running after Link and simply sits on his head. Now return to the large tree stump. Ezelo explains there that the creatures known as Picori call themselves Minish and are tiny.


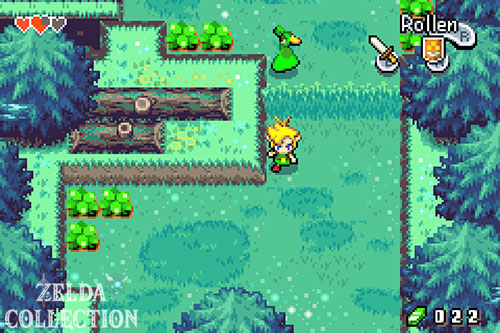

Stand on the tree stump and press R. Link shrinks to Minish size. Go west through the small tree trunk. The tiny expanse of water behind is a huge lake for a Minish, so wait for the lily pad to float by and head to the other side. Then follow the narrow path north to the Village of the Forest Minish.
Piece of Heart #2 in Forest Minish Village
The residents speak to Link immediately, but their language is initially incomprehensible. Before we deal with that, let’s get the second Piece of Heart. Run to the northeast of the village to the blue building. To the right, a narrow wooden path leads further through the trees. Follow him east and take Piece of Heart #2.


Festari and the nonsense ball
Then enter the blue building and talk to Festari. He understands Link and explains that you must first learn the Minish language. To do this, Link needs a Jabber Nut. Go to the large barrel house in the east of the village, climb in and push the crate out of the way. Take the nonsense ball. Link automatically eats them and can now speak to all Minish.


The village elder and the four elements
Now go to the yellow house in the northwest of the village and talk to the village elder. Ezelo shows him the broken Minish sword. The elder explains that four elements are needed for repair: earth, fire, drops and wind. Fortunately, one of them is located directly north of the village in the Deepwood Shrine.
Return to Festari in the blue building. After speaking to the village elder, Festari clears the northern passage. Go through the tunnel and follow the path to the entrance to the first dungeon.


Deepwood Shrine – first key
In the entrance room, spider webs initially block both side paths. So push the middle statue aside and go north. In the next room, Sluggulas fall from the ceiling; their shadows show you where they land. Activates all four Floor Switch around the torches. Once all four have been pressed, a chest will appear in the middle with the first Small Key. Use this to open the northern door.


Bridge, mushroom and the big barrel
In the following room, pull out the lever in the northeast completely. This causes a bridge to extend to the middle platform. Cross it and grab the big mushroom. Pull it back and let go to send Link flying to the other side. In the next room is the huge barrel that forms the central part of the Deepwood Shrine.
First go to the right side and activate the switch there. A torch ignites and burns the first vines. Then run through the barrel to the western side. Push the statue onto one switch there and put Link himself on the second one. The remaining tendrils burn, allowing the barrel to rotate freely.


Second key and Dungeon Map
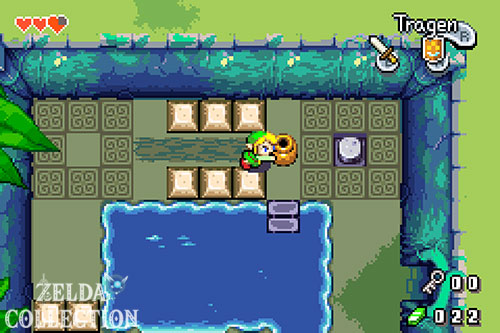
Enter the barrel and walk through it until the southwest exit is reachable. Go through the western door. Just pull the mushroom up to the first marker so that you land on the middle platform. Push a jug onto the Floor Switch on the left. In the southern room there are two statues and two switches. First push a statue over its actual switch so that you get into the interior area, and then move both statues onto the switches. The chest with the next Small Key becomes reachable.
Return to the mushroom and pull it all the way this time. Link lands in the far north. Open the chest there with the Dungeon Map. Then return to the barrel and use the northeast exit.




Next key and path to Imos
Opens the locked door to the east. Drag the mushroom again just to the appropriate marking, activate the switch on the left and catapult yourself to the south with the second mushroom. In the next room, two statues must be moved again to Floor Switch. First position the right one behind its switch and then push both of them correctly onto the fields.
Go north and defeat all enemies. Afterwards a chest will appear with another Small Key. Run up the stairs to the west, jump to the right on the upper level and follow the path to the left. Activates the Floor Switch. The southern door opens, but we first go through the locked door to the west.


Miniboss Imos and the Gust Jar
Imos, a huge caterpillar, is waiting behind the door. Hits the head from the front. The opponent stops briefly and his tail becomes vulnerable. Quickly run around Imos and attack the back segment. After a few hits, the caterpillar turns red and races through the room much faster. Keep your distance until she calms down again and then repeat the process.
After the victory, a large chest will appear with the Gust Jar. This item sucks in air, dust, spider webs and certain enemies and can conversely create powerful blasts of air. From now on we can open the previously blocked paths of the dungeon.


Piece of Heart #3 and 20 Mysterious Shells
Directly sucks away the spider web on the southern wall of the intermediate enemy room. Behind it is Piece of Heart #3. Return to Imos’ room and then clear the eastern spider web.
In the next room there are large areas of dust on the floor. Suck them away completely. Several switches appear underneath. Two of them leave chests with each 10 Mysterious Shells appear – so 20 in total. Take both with you, because the shells will be needed later for the complete figure collection. Another switch activates it blue teleporter.


lily pad and last Small Key
Return to the large barrel and suck away the spider web inside. Jump through the uncovered hole one floor below. Suck the lily pad with the Gust Jar towards you and climb on it. Always point the jug in the opposite direction to the desired direction of travel; the blast of air propels the leaf through the water.
First drive east and push a jug onto the Floor Switch so that the barrier disappears. Remember: Link can only leave the lily pad in light blue shallow water. Then drive further north. Equip on the far left and push a jug onto a switch again. This will make the chest reachable with the next Small Key.


Compass and Big Key
Move the stone blocks on the right and open the chest with the Compass. Then return to the junction with the lily pad and go north to the locked door. Open it with your key.
In the next section you first catapult yourself onto the higher platform with a mushroom. You can reach the next mushroom with the Gust Jar: suck it from a distance until Link is pulled or thrown over to it. Repeat this for the following mushrooms. At the end you will reach the large chest with the Big Key.


Piece of Heart #4 and final chest
After the Big Key, activate the Floor Switch and use the teleporter available through it back to the entrance area. The blue teleporter that we previously unlocked is now there. Use it and Link will land on the raised platform with Piece of Heart #4. Since this is our fourth Piece of Heart, a complete additional Heart Container is automatically created.
Then returns to the entrance. Suck the spider web on the western stairs, climb up and move the stone in front of the chest. Inside are 20 Rupees. Then go back to the entrance and through the eastern staircase, which has also been freed from the spider web.


Boss: Green Giant Slime
Use the Gust Jar on the mushrooms on the eastern side and catapult Link first to the west and then north to the boss door. If you still need hearts, break the jars next to it and open the door with the Big Key.
The Green Giant Slime is actually just an ordinary green slime – but Link has shrunk to Minish size. Direct sword blows initially have no effect. Equip the Gust Jar and suck on the enemy’s lower part. Its base becomes thinner and thinner until the slime loses its balance.
Take a few steps back in time. The huge body then tips to the side and can hit Link as he falls over. As soon as the head is on the ground, run up and strike with the sword as quickly as possible. After a short while he stands up again. Repeat the process from suck → dodge → attack head. With each round, the slime becomes more mobile and jumps around the arena more often, but the basic principle does not change.


Heart Container and earth element
After the victory, Link gets a full Heart Container and the Earth Element. Take both with you. Together with the Heart Container from the four Pieces of Heart collected, Link now has two more hearts than at the beginning of the adventure.
The teleporter takes you back to the entrance to the Deepwood Shrine. Leave the dungeon and return to the Forest Minish Village. Speak to the village elder again. He explains that to repair the Minish sword you should visit the famous blacksmith Melari on Mount Crenel.

Bombs before leaving the village
Then leave the village elder’s house through the western exit. Don’t grow up yet. First go into the small Minish house on this path. Minish, who lives there, gives Link the bomb bag with bombs. Only then do you go to the tree stump and return to normal size.

This ends our first section. In the next chapter, the bombs open up new paths, and at the same time the Kinstones are unlocked in the city of Hyrule. From there, our 100% route takes us to Mount Crenel and the Cave of Flames via several early upgrades.
Next: Mount Crenel and Cave of Flames
With the bombs we leave the Tyloria Forest and return to Hyrule Town. There we receive the lucky bag, learn our first sword technique and start with the first Kinstone Fusions. The path then leads to Mount Crenel, where the next Pieces of Heart, upgrades and the second dungeon are already waiting for us.
Continue with Chapter 2: Mount Crenel and Cave of Flames.
For individual collectibles you can also find our guides to the 44 Pieces of Heart, Kinstones, four bottles, sword techniques and weapon upgrades.