
All 41 Treasure Charts in The Wind Waker
In The Legend of Zelda: The Wind Waker for Nintendo GameCube you can find a total of 41 Treasure Charts. Each Treasure Chart leads to a sunken treasure on the Great Sea. In order to complete the game, you not only have to collect all the cards, but you also have to recover the 41 corresponding treasures.
Among the rewards are Rupees, eleven Pieces of Heart and several special cards.
Difference to the Wii U version: The Wind Waker HD also has the Treasure Charts numbers 42 to 46 and thus comes to a total of 46 Treasure Charts. These five additional maps do not exist in the GameCube version.
Use Treasure Charts
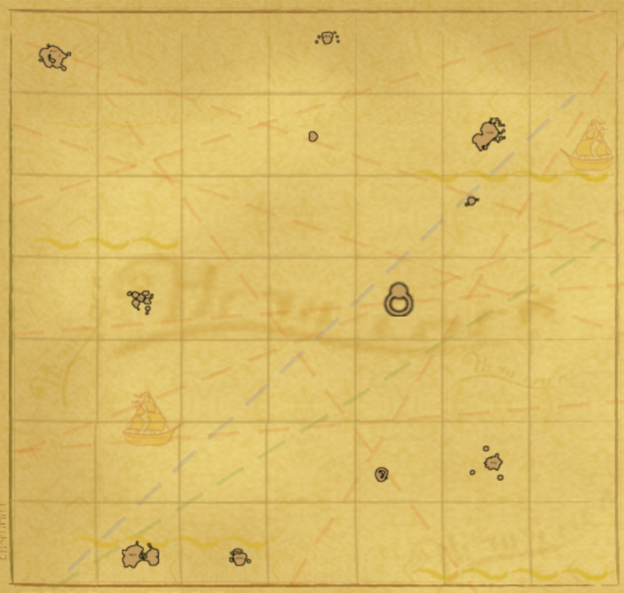
To find sunken treasure, you must be on the King of Red Lions and open the nautical map. Then display the Treasure Charts and select the grid square in which the treasure you are looking for is located.
So that you can orientate yourself reliably, you should have Fishman uncover the respective grid square beforehand. Compare the shape of the island and the location of the treasure on the Treasure Chart with your position on the nautical chart.
Then drive slowly to the marked location. If you are close enough to the treasure, a glowing ring will appear on the water. Stop and use the Grappling Hook as a crane to bring the sunken chest to the surface.
If you have already recovered a treasure, this will be noted on the respective Treasure Chart.
rewards of the 41 Treasure Charts
- 23 Silver Rupees worth 200 Rupees
- 11 Pieces of Heart
- 6 special cards
- 1 Green Rupee worth 1 Rupee
each
Difference from the Wii U version: There the reward of Treasure Chart No. 18 was changed from a green Rupee to a purple Rupee worth 50 Rupees changed. Additionally, the additional Treasure Charts numbers 42 to 46 result in three Orange Rupees, one Silver Rupee and one additional Piece of Heart.
Treasure Charts No. 1 to 10
Treasure Chart #1 – Forbidden Woods
Location: Forbidden Woods (F6)
Treasure: Silver Rupee at Private Oasis (E5)
In the second room of the Forbidden Woods, jump with the Plantahumpas to the upper area. On the southern platform, a Treasure Chest is blocked by a plant. Destroy it with the Boomerang and then open the chest.
The Treasure Chart leads to Private Oasis. Collect the marked treasure there for a Silver Rupee worth 200 Rupees.
Treasure Chart #2 – Windfall Island
Location: Windfall Island (D2)
Prerequisite: Aryll saved, 20 skull chains
Treasure: Piece of Heart at Rock Spire Isle (B3)
After you saved Aryll on your second visit to the Enchanted Bastion, Maggie’ father became rich on Windfall Island.
Show him a total of 20 skull necklaces. As a reward you will receive Treasure Chart No. 2.
The map leads to Rock Spire Isle. Collect the marked treasure there and you will get one of the 44 Pieces of Heart.
Treasure Chart #3 – Forest Haven
Location: Forest Haven (F6)
Requirement: Deku Leaf
Treasure: Silver Rupee at the Eastern Fae Cordial (E3)
On a small island separated from the main area southeast of Forest Haven is a Treasure Chest.
Climb onto one of the outer ledges of Forest Haven, adjust the wind appropriately and glide to the small island with the Deku Leaf.
Open the chest there with Treasure Chart No. 3. The corresponding treasure at the Eastern Fairy Cordial contains 200 Rupees.
Treasure Chart #4 – Beedle’s Specialty Shop
Location: Rock Spire Isle (B3)
Price: 900 Rupees
Treasure: Piece of Heart at the Southern Fae Cordial (D6)
A special masked Beedle merchant ship sails in the grid square of Rock Spire Isle.
There you can buy Treasure Chart No. 4 for 900 Rupees. Since Beedle also sells a Empty Bottle and a Piece of Heart, it’s worth picking up one of the wallet upgrades beforehand.
Treasure Chart #4 leads to the Southern Fae Cordial, where you can recover another Piece of Heart.
Treasure Chart #5 – Wind Temple
Location: Wind Temple (D1)
Treasure: Piece of Heart at Thornarm Fairy Cordial (G4)
After you get to the first basement floor through the large fan in the Wind Temple, you enter the room to the east of it.
Defeat all enemies there. Pay particular attention to the enemies hiding behind the stone slabs on the walls. Once the room is completely cleared, you can collect Treasure Chart #5.
It leads to the Thornarm Fairy Cordial, where a Piece of Heart lies hidden in the sea.
Treasure Chart #6 – Tower of the Gods
Location: Tower of the Gods (E4)
Requirement: Hero Bow
Treasure: Silver Rupee at Sixeye Reef (D4)
Go from the entrance area of the Tower of the Gods to the back left room. There is a Eye Switch.
Hit him with an arrow. This makes the Treasure Chest accessible with Treasure Chart No. 6.
The map leads to the Six Eyes Reef and a Silver Rupee.
Treasure Chart No. 7 – sink ships
Location: Windfall Island (D2)
Treasure: Silver Rupee at Stardust Island (B1)
Play the sinking ships minigame with Salvatore on Windfall Island.
On the first successful run you will receive a Piece of Heart. Then win a second time and Salvatore will give you Treasure Chart No. 7.
The sunken treasure at Stardust Island contains 200 Rupees.
Treasure Chart #8 – Horseshoe Island
Location: Horseshoe Island (A7)
Requirement: Deku Leaf
Treasure: Silver Rupee at the Western Fairy Cordial (A3)
Complete the game with the three nuts and the corresponding holes on the horseshoe island.
After the third section, a secret passage becomes accessible. Jump in and defeat all enemies in the cave.
As a reward you will receive Treasure Chart No. 8. The corresponding treasure at the Western Fairy Cordial contains 200 Rupees.
Treasure Chart #9 – Shimmering Crescent
Location: Submarine northeast of the Shimmering Crescent (E1)
Treasure: Silver Rupee at Horseshoe Island (A7)
Search for a submarine northeast of the Shimmering Crescent and enter it.
Defeat all enemies inside. You can then open the Treasure Chest with Treasure Chart No. 9.
The map leads to Horseshoe Island and a Silver Rupee.
Treasure Chart #10 – Shimmering Crescent
Location: Shimmering Crescent (E1)
Treasure: Silver Rupee at Tingles Island (C3)
On the Shimmering Crescent is a Treasure Chest with Treasure Chart #10.
The corresponding sunken treasure is located on Tingle’s Island and contains 200 Rupees.
Treasure Charts No. 11 to 20
Treasure Chart #11 – Dragon Roost Cavern
Location: Dragon Roost Cavern (F2)
Requirement: Grappling Hook
Treasure: Piece of Heart at the Shimmering Crescent (E1)
From the entrance to the Dragon Roost Cavern, go straight ahead into the large lava hall and turn left there.
Swing over the abyss with the Grappling Hook and destroy the boards on the opposite side. Behind it you will find the chest with Treasure Chart No. 11.
The associated treasure at the Shimmering Crescent contains a Piece of Heart.
Treasure Chart #12 – Earth Temple
Location: Earth Temple (C7)
Treasure: Silver Rupee at Five Eyes Reef (B6)
On the second basement floor you reach the room with the six movable mirrors.
From there go west and shine the light on the coffins. Defeat all enemies that appear as a result.
Then you get Treasure Chart No. 12. The sunken treasure at Five Eyes Reef contains 200 Rupees.
Treasure Chart No. 13 – Two Eye Reef
Location: Two-Eye Reef (D7)
Requirement: bombs and Deku Leaf
Treasure: Secret passage map at Overlook Island (G1)
Destroys all cannons and enemy ships in Two-Eye Reef.
This causes a Treasure Chest to appear within the reef. Climb the outer wall and slide to the chest with the Deku Leaf.
Treasure Chart No. 13 leads to Overlook Island. There you can recover the secret passage map.
Treasure Chart #14 – Headstone Island
Location: Submarine northwest of Headstone Island (C7)
Treasure: Silver Rupee at Tower of the Gods (E4)
Search for a submarine northwest of Headstone Island. Enter it and defeat all enemies inside.
Then open the chest with Treasure Chart No. 14.
The treasure at Tower of the Gods contains 200 Rupees.
Treasure Chart #15 – Forbidden Woods
Location: Forbidden Woods (F6)
Requirement: Boomerang, Deku Leaf and bombs
Treasure: Piece of Heart at Staircase Island (E7)
Go to the northern room in the basement and eliminate all enemies.
Let the Plantahumpa throw you up and glide to the northern platform with the Deku Leaf. Then bring in the movable gondola and ride it to the opposite side.
Throw a bomb into the hollow tree stump in the middle there. This will cause the chest containing Treasure Chart #15 to appear.
The map leads to a Piece of Heart at the stairway island.
Treasure Chart No. 16 – Seven-Star Isles
Location: Viewing platform southeast of Seven-Star Isles (F1)
Treasure: Silver Rupee at Shark Island (C6)
Look for a viewing platform southeast of Seven-Star Isles and defeat the enemies or destroy the guns.
In one of the chests you will find Treasure Chart No. 16.
The corresponding treasure at Shark Island contains 200 Rupees.
Treasure Chart No. 17 – Isla Binocular
Location: Isla Binocular (C2)
Treasure: Silver Rupee at Firn Island (E6)
Participate in Salvatore’s Cannon Game on Isla Binocular.
Hits all five targets in one pass. For another successful round you will get Treasure Chart No. 17.
The associated treasure at Firn Island contains a Silver Rupee.
Treasure Chart #18 – Windfall Island
Location: auction house on Windfall Island (D2)
Treasure: Green Rupee at Windfall Island (D2)
Treasure Chart No. 18 is one of the possible items in the night auction on Windfall Island.
Win the corresponding auction and then recover the treasure in the sea off Windfall Island.
In the GameCube version, the chest actually only contains one Green Rupee worth 1 Rupee.
Difference from the Wii U version: In The Wind Waker HD, this reward has been increased to a Purple Rupee worth 50 Rupees.
Treasure Chart No. 19 – Four Eye Reef
Location: Four-eye reef (A2)
Requirement: bombs and Deku Leaf
Treasure: Island Hearts Map at Airfield (G2)
Destroys all cannons and enemy ships within the Four Eyes Reef.
This causes a Treasure Chest to appear. Climb onto the outer wall and glide to it with the Deku Leaf.
Treasure Chart No. 19 leads to the airfield. The treasure sunk there contains the Island Hearts card.
Treasure Chart #20 – Earth Temple
Location: Earth Temple (C7)
Treasure: Piece of Heart at Bomb Island (F5)
In the first basement you will reach a room with two mirrors. Go west from there.
Defeat all enemies in the following room. The chest with Treasure Chart No. 20 then appears or opens.
The map leads to Bomb Island, where you can recover a Piece of Heart from the sea.
Treasure Charts No. 21 to 30
Treasure Chart #21 – Single Eye Reef
Location: Single Eye Reef (C4)
Treasure: Glow Circle Map at One Eye Reef
Destroys all cannons and enemy ships in One-Eye Reef.
Then climb onto the outer wall and glide with the Deku Leaf to the Treasure Chest that has appeared.
With Treasure Chart No. 21 you can recover the light circle card in the same grid square.
Treasure Chart #22 – Northern Fae Cordial
Location: Submarine northwest of the Northern Fae Cordial (C1)
Treasure: Silver Rupee at Isla Binocular (C2)
Enter the submarine northwest of the Northern Fairy Cordial and defeat all enemies.
You will then find Treasure Chart No. 22 in the unlocked chest.
The treasure at Isla Binocular contains 200 Rupees.
Treasure Chart No. 23 – Salvatore’s record
Location: Windfall Island (D2)
Treasure: Piece of Heart at Rhombus Island (A6)
Replay Salvatore’s Ship-Sinking minigame on Windfall Island.
This time a normal victory is not enough: you have to sink all three ships with less than 20 shots.
As a reward you will receive Treasure Chart No. 23. It leads to Rhombus Island, where a Piece of Heart is hidden in the sea.
Treasure Chart #24 – Kogfa’s Secret Meeting
Location: Windfall Island (D2)
Requirement: Deku Leaf and Deluxe Picto Box
Treasure: Silver Rupee at Northern Fae Cordial (C1)
First sets the wind turbine on Windfall Island in motion. To do this, climb up the ladder at the back of the building, direct the wind to the north and press the switch.
Then take a gondola up and glide with the Deku Leaf onto the balcony of the photo studio.
Inside, crawl through the hidden passage and observe Lenzo during his secret meeting. Photograph the two of them with the Deluxe Picto Box without being discovered first.
Then shows the photo to the two gossiping women on Windfall Island. You get Treasure Chart No. 24.
The treasure at the Northern Fairy Cordial contains 200 Rupees.
Treasure Chart #25 – Flugrock Island
Location: Flugrock Island (G6)
Requirement: Deku Leaf and bombs or Fire Arrows
Treasure: Silver Rupee at the Enchanted Bastion (A1)
Jump over the rocks on Flugfels Island and follow the path into the cave.
Work your way over the tree trunks and through the plant maze. Clear the blocked passage with a bomb or fire arrow.
Then slide to the other side with the Deku Leaf and open the chest with Treasure Chart No. 25.
The sunken treasure at the Enchanted Bastion contains 200 Rupees.
Treasure Chart No. 26 – Sixeye Reef
Location: Sixeye Reef (D4)
Requirement: bombs and Deku Leaf
Treasure: Octalus Map at Northern Triangle Island (D3)
Destroys all cannons and enemy ships in Sixeye Reef.
Then climb onto the outer wall and use the Deku Leaf to slide to the chest that has appeared.
Treasure Chart No. 26 leads to the North Triangle Island. There you will find the octalus map, on which the positions of the Great Octaluses are marked.
Treasure Chart No. 27 – Private Oasis
Location: Private Oasis (E5)
Requirement: Hookshot
Treasure: Silver Rupee at Star Belt Archipelago (G3)
Go behind the property on Private Oasis and look for the high rock with the palm tree.
Pull yourself up from palm to palm with the Hookshot. At the highest point you will find the chest with Treasure Chart No. 27.
The map leads to Star Belt Archipelago and a Silver Rupee.
Treasure Chart #28 – Horseshoe Island
Location: Horseshoe Island (A7)
Requirement: Deku Leaf
Treasure: Silver Rupee at Needle Rock Island (A5)
Complete the nut game on the horseshoe island and put all the nuts into the designated holes. With the Deku Leaf you can influence the trajectory.
After completing the course, the chest with Treasure Chart No. 28 can be reached. Use the Deku Leaf to glide across.
The treasure at Needle Rock Island contains 200 Rupees.
Treasure Chart No. 29 – Photo Studio
Location: Windfall Island (D2)
Requirement: Deku Leaf
Treasure: Silver Rupee at Mother and Child Isles (B2)
Makes the wind turbine from Windfall Island move again and climbs into a gondola.
Glides onto the balcony of the photo studio at the highest point with the Deku Leaf.
Inside there are two Treasure Chests. One of them contains Treasure Chart No. 29.
The corresponding treasure at Mother and Child Isles contains 200 Rupees.
Treasure Chart #30 – Tower of the Gods
Location: Tower of the Gods (E4)
Treasure: Piece of Heart at Tapsen Island (E2)
Go to the room with the scales on the first floor and examine the lower area.
Blow up the cracked wall there. Since the water can extinguish the bomb, you should only throw it shortly before it explodes.
In the next room, play the song of the wind on the wind symbol and defeat the opponents. This will give you Treasure Chart No. 30.
It leads to Tapsen Island and another Piece of Heart.
Treasure Charts No. 31 to 41
Treasure Chart No. 31 – Photo of the full moon
Location: Windfall Island (D2)
Requirement: Deluxe Picto Box
Treasure: Piece of Heart at Forest Haven (F6)
Speak to the man on the stairs of Windfall Island, who wants to see a picture of something perfectly round and pale.
Wait for a full moon night and photograph the full moon with the Deluxe Picto Box.
Show him the photo and you will get Treasure Chart No. 31.
The associated treasure off Forest Haven contains a Piece of Heart.
Treasure Chart No. 32 – Three Eye Reef
Location: Three-eye reef (A4)
Requirement: bombs and Deku Leaf
Treasure: Sea Hearts Map at Nautodrome (F7)
Destroys all ships and cannons in Three Eyes Reef.
Climb the outer wall and glide with the Deku Leaf to the appeared Treasure Chest.
Treasure Chart No. 32 leads to the Nautodrome. You can recover the Sea Hearts card there.
Treasure Chart No. 33 – Photo on Windfall Island
Location: Windfall Island (D2)
Requirement: Deluxe Picto Box
Treasure: Piece of Heart at Isla Cassiopeia (G7)
Photographs the woman in front of the pharmacy on Windfall Island with the Deluxe Picto Box. Make sure that the head and upper body are clearly visible in the picture.
Then show her the photo. As a reward you will receive Treasure Chart No. 33.
It leads to Isla Cassiopeia, where you can recover a Piece of Heart from the sea.
Treasure Chart No. 34 – Treasure Hunting Divers
Location: different grid squares of the Great Sea
Treasure: Silver Rupee at Eastern Triangle Island (F4)
On the sea you will meet treasure hunters or divers several times who are circling around a salvage site.
Speak to one of the corresponding treasure hunters at Tapsen Island, the Western Fairy Cordial, the Northern or Eastern Triangle Island or the Horseshoe Island, among others.
This will give you Treasure Chart No. 34.
It leads to the Eastern Triangle Island and a Silver Rupee.
Treasure Chart #35 – Wind Temple
Location: Wind Temple (D1)
Treasure: Silver Rupee at the Floating Fortress (B5)
Return to the area in the first basement where you previously found the Compass.
Let yourself be thrown upwards and break through the corresponding floor plates. Then defeat all opponents.
As a reward you will receive Treasure Chart No. 35.
The corresponding treasure at the Floating Fortress contains 200 Rupees.
Treasure Chart No. 36 – Firn Island
Location: Firn Island (E6)
Requirement: Fire Arrows
Treasure: Silver Rupee at Greifenhorst Island (G5)
There is a frozen Treasure Chest on Firn Island.
Shoot it with a fire arrow to melt the ice and then open the chest.
Treasure Chart No. 36 leads to Greifenhorst Island and a Silver Rupee.
Treasure Chart No. 37 – Rock Spire Isle
Location: Rock Spire Isle (B3)
Requirement: bombs
Treasure: Silver Rupee at Ignis Peak (F3)
Blast away the rocks on Rock Spire Isle. If necessary, hold the bombs briefly before throwing them so that they explode as close to the obstacles as possible.
Then enter the cave under the island and light all the torches there.
This will cause the chest containing Treasure Chart #37 to appear.
The treasure at Ignis Peak contains 200 Rupees.
Treasure Chart #38 – Auction on Windfall Island
Location: Windfall Island (D2)
Treasure: Piece of Heart at the Three Eyes Reef (A4)
Treasure Chart No. 38 is among the possible prices of the nightly auctions on Windfall Island.
If it is offered, you have to win the auction.
The map leads to Three Eyes Reef. There you can recover one of the 44 Pieces of Heart.
Treasure Chart #39 – Dragon Roost Cavern
Location: Dragon Roost Cavern (F2)
Treasure: Silver Rupee at Dragon Roost Island (F2)
After you have crossed the large lava hall on the first floor, you will reach a room with an unlit torch.
Ignite them. This makes the Treasure Chest accessible with Treasure Chart No. 39.
The corresponding treasure is located in the same grid square at Dragon Roost Island and contains 200 Rupees.
Treasure Chart #40 – Southern Fae Cordial
Location: Viewing platforms at the Southern Fairy Cordial (D6)
Requirement: bombs and Deku Leaf
Treasure: Silver Rupee at Headstone Island (C7)
There are several viewing platforms near the Southern Fairy Cordial.
Destroy the cannons and defeat the enemies. A Treasure Chest then appears on one of the platforms.
Since this platform cannot be reached directly via a ladder, you have to glide over from a neighboring platform with the Deku Leaf.
Opens the chest for Treasure Chart No. 40. The corresponding treasure at Headstone Island contains 200 Rupees.
Treasure Chart No. 41 – Five Eyes Reef
Location: Five Eye Reef (B6)
Requirement: bombs and Deku Leaf
Treasure: Great Fairy Card at Four-Eye Reef (A2)
Destroys all cannons and enemy ships within Five Eyes Reef.
This causes a Treasure Chest to appear inside the reef. Climb the outer wall and use the Deku Leaf to slide to the corresponding platform.
In the chest is Treasure Chart No. 41 and therefore the last regular Treasure Chart of the GameCube version.
The corresponding treasure is located at the Four Eyes Reef and contains the Great Fairy Card. It shows you the locations of the Great Fairies on the Great Sea.
Differences from The Wind Waker HD on Wii U
The treasure map collection has been changed in several places for the Wii U version. The following differences are particularly important for the GameCube version discussed here:
- GameCube: 41 Treasure Charts
- Wii U: 46 Treasure Charts
- Treasure Charts #42 to 46 exist exclusively in The Wind Waker HD.
- There are eight Triforce cards in the GameCube version. In the HD version, five of them were removed and replaced with directly discoverable Triforce shards.
- The resulting free Locations contain the additional Treasure Charts numbers 42 to 46 in HD.
- Treasure Chart #18 results in a Green Rupee worth 1 Rupee on GameCube; In HD there is a purple Rupee worth 50 Rupees.
- Eleven of the 41 GameCube treasure maps lead to Pieces of Heart. In HD, twelve of the 46 Treasure Charts lead to Pieces of Heart.
- The additional HD heart piece comes from Treasure Chart #46. On GameCube, this Piece of Heart is instead at the end of the Savage Labyrinth on Outset Island.
Status after all Treasure Charts
- 41 of 41 Treasure Charts found
- 41 of 41 sunken treasures recovered
- 11 Pieces of Heart from Treasure Charts received
- 23 Silver Rupees recovered
- 6 special cards recovered
- 1 Green Rupee recovered from Treasure Chart No. 18
The eight Triforce cards are not among the 41 normal Treasure Charts. Since they make up a much larger portion of the Triforce quest in the GameCube version than on Wii U, we cover them separately in our Walkthrough on Triforce of Courage.