

Restore Ilia’s memory, recover the Ancient Sky Book and collect its six Sky Characters. Repair the Sky Cannon at Lake Hylia, enter the City in the Sky and obtain the Double Clawshots before fighting Argorok.
Game version: The route and screenshots follow the GameCube version. The normal mode of Twilight Princess HD has the same orientation; on Wii and in HD Hero Mode, left/right and east/west are swapped. HD deviations are at the affected step.
Ilia’s memory: Renado, Telma and the wooden statue
Warp to Kakariko and talk to Renado in the sanctuary. He gives you a letter for Telma. Show her this in the Castle Town tavern; You will receive the bill for the doctor. Find the practice in the side street and show the doctor the bill. As soon as he turns away, you go to the bed in the back room and push the wooden box aside.
Transform yourself into a wolf without being observed and use your instincts to examine the medicine on the ground. Confirm the new smell to pick up the medicine scent. Follow her through the city to Telma’s cat Louise. She reports about bone dogs in front of the south gate. Leave the city there at night and completely defeat the group that appears. The wooden statue you were looking for is left behind as a reward.
Bring the statue to Ilia in Kakariko. She remembers an old woman who helped her. The clue leads to a hidden village north of the Bridge of Eldin. Follow the new marker on the map to the rock tunnel. Darbus clears the blocked access.
The Hidden Village: 20 Bulblins and Ilia’s Clay Flute
Take a full quiver of arrows with you. The Hawkeye from Malo’s shop makes searching on roofs and balconies easier, but is not a requirement for entry. Use the bow at the village entrance to eliminate visible shooters. Then work your way street by street and house by house. Check the alleys behind the buildings and the rooms you can access through breakable windows. The counter displayed must decrease from 20 to zero.
Do not leave the village during this fight, otherwise the enemy task will begin again. After the last shooter, the old woman Impaz appears. Talk to her and take Ilia’s clay flute with you. Before you leave, break the windows in the building on the side leading to the back yard and activate the howling stone as a wolf. He marks the Golden Wolf for the last of the Hidden Skills.
Show the flute to Ilia in Kakariko. Her memory returns and you receive the Horse Call. Then find Impaz again and show her the Dominion Rod. She recognizes the heavenly messenger you are looking for and gives you the old heavenly book. Take it to Shad in Renado’s basement. Show him the book; his attempt on the owl statue recharges the Dominion Rod. Only now do the statues on the upper world react. Six locations will be marked on your map.
Cat Task and Poe Soul in Hidden Village
When you visit again, you can talk to the boss of the chickens in the backyard as a wolf and start the cat task. Talk to all 20 animals, also check floors and balconies and, if necessary, use the Clawshot as a human for increased access. To speak, turn back into a wolf. You can find a hard-to-reach cat by changing the window on the upper floor.
Don’t interrupt the task: Do not leave the village, enter Impaz’s house, or cry at the Howling Stone while searching. After the 20th cat you return to the chicken. Then fetch Piece of Heart 38 on Impaz’s doorstep actually off. At night there is also a ghost waiting on the raised ledge of the house; pull yourself up and snatch the Poe Soul from him as a wolf. This means that this visit can be combined with the Poe Souls Collection connect.
Collect six celestial signs with the Dominion Rod
The order of the statues is free. Warp close to the marked spot. Use the Dominion Rod to move the owl from its base and enter the glowing circle below; Just moving it doesn’t add to the book. The Dominion Rod guides the statue parallel to your own steps. To jump, you first stop the controls and leave them as a step.
Kakariko Valley and Bridge of Eldin
In the northern part of Kakariko Valley, an owl stands in a niche between raised grass verges. Pull it out and put it in its old location. To get the chest, use the statue twice as an intermediate step: first across the gap to the next ledge and from there across the second gap. In HD, the chest contains Stamp E.
On the north side of the Bridge of Eldin you reach the statue on the raised part of the wall. Get the shooter out of the way, move them and collect the token. Then lead them across the bridge to the south. At the damaged entrance to the bridge tower, lower her into the gap and jump over her head to the ladder. At the top, defeat the archer and open the chest with Piece of Heart 39.
Faron Woods and ruins near Castle Town
Warp to South Faron, go to Coro’s hut and open the side path blocked by a boulder. Move the owl from its base and collect the token. Then place it in the round recess near the tree. As a wolf you go to the small hill; Midna now offers the jump sequence over the upper ledges. Follow her to the chest with Piece of Heart 40.
In the stone ruins west of Castle Town, the next owl stands on a pillar. Defeat the Bulblins and walk down the statue. Place her between the stairs and the former pedestal so you can jump over her head to the sign. You can then move it again as an intermediate level for the neighboring ruby chest.
Great Bridge of Hylia and Gerudo Desert
On the way to the Great Bridge of Hylia you will find an owl in a high rock niche. Guide them downward and place them directly under the vines. Use the Clawshot to pull yourself up and drop onto her head. From there you jump to the exposed base. For the neighboring chest, you then move the statue between the two niches.
The desert statue stands near a group of stone blocks on the southern edge of the desert. Lead her down. Only one of the blocks can be climbed directly; place the owl between this block and the base with the symbol. Jump over them to the glowing area. You can reach another chest by taking the statue from the upper blocks to the next gap.
Golden Wolf and the Sky Cannon
If you have activated the Howling Stone in the Hidden Village, look for the Golden Wolf at the northern exit of Castle Town. Once the previous techniques are learned, you will receive the Great Spin. It strengthens the whirling attack at full health.
Return to Shad in Renado’s basement with all six characters and show him the completed book. After reading it, you can move the owl statue in front of the passage. Behind it lies the old cannon. Talk to Shad until he leaves the room; Midna doesn’t want to warp the cannon in front of him. Then examine her again and take her to Lake Hylia with Midna.
As a human, speak to Fyer at his cannon station and pay 300 Rupees for the repair. Only then is the sky cannon ready for use. Pull yourself to the target on their backside with the Clawshot. Ooccoo accompanies you on the flight to City in the Sky; that’s where the dungeon route begins below.
Anyone who has followed our previous 100% Walkthrough for Twilight Princess should also already have all 24 Golden Bugs, all seven Hidden Skills and 55 Poe Souls when entering City in the Sky. The two ghosts in City in the Sky would be numbers 56 and 57, respectively.
arriving in City in the Sky
The sky cannon does not set Link down gently. You land directly in a large pool of water. Before you can get your bearings, your Ooccoo appears behind you. Shortly afterwards, a huge dragon passes over the city. We will get to know this enemy in more detail at the end of the dungeon.
Before we go any further, let’s search the starting pool. Put on the Zora Armor and then the Iron Boots. At the bottom there are several small Treasure Chests with Rupees or bombs. Although they are not crucial for the 100% score, we will still take them with us on our complete tour.
Then get out of the water again.
The Oocca shop and the Ooccoo
At the edge of the pool there is a small building that serves as a shop. At this point it becomes clear why our companion has behaved so strangely in the past dungeons: the residents of City in the Sky look practically exactly like the Ooccoo.
Enter the shop and talk to her. From now on you can use the Ooccoo again in City in the Sky. It will take you out of the dungeon to the shop and then back to the spot where you used it.
If you need arrows, bombs or medicine, you can also prepare here.
There is also another sky cannon in the southern area of the launch platform. She brings Link back to Earth. However, simply jumping over the edge of City in the Sky is not a shortcut – there is no accessible ground beneath the city.
Open the gate to the city proper
Go north from the pool of water. The strong gusts of wind can cause problems for Link even on this short route. As soon as there is a strong gust of wind, put on the Iron Boots. The extra weight prevents Link from being blown away.
There is a large locked gate in front of you. There is a Crystal Switch above the door. Hit him with the Clawshot or an arrow. During a gust of wind, the Clawshot is the more reliable option.
The grid opens. As you approach the entrance, a tracking shot shows the entire extent of the celestial city for the first time. Then enter the first large room.


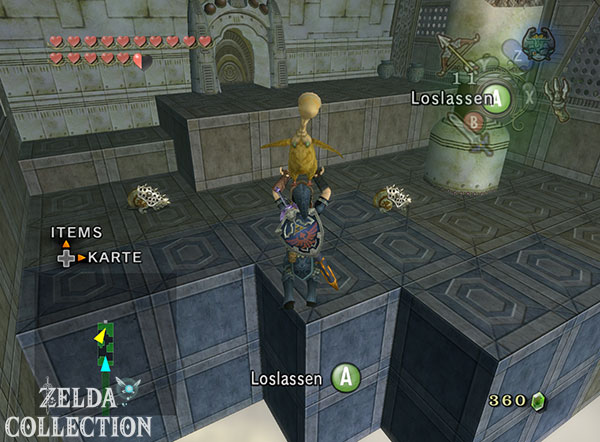

cumulative as Spinner and the blue base plates
In the first interior you will get to know two of the most important mechanics of City in the Sky.
The blue floor tiles initially look like normal stone blocks. However, as soon as Link enters them, they begin to fall down after a few seconds. So keep running without taking a break and never stop on a blue block.
The small cumulans, on the other hand, can be carried like chickens. If you pick one up and jump over an abyss, Link will slowly slide down. This allows distances to be bridged that would be far too great for a normal jump.
Pick up the first cumulan and glide to the opposite platform. A Helmasaur is waiting there. Use the Clawshot to pull the armor off his back and kill him with the sword.
Then look up and use the Clawshot to pull yourself onto the tendrils of the pillar. Climb around sideways and drop onto the higher platform.
Now use the Clawshot to pull another cumulaner from the wall towards you. Use it to cross the next large gap. Follow the path to the central hall of City in the Sky.
First bridge and Small Key
A larger Helmasaurus awaits in the central hall. Its massive back armor cannot be easily removed with the Clawshot. Dodge his attack and attack him from behind. The backhand or other Hidden Skills work particularly well here.
Then look for the large window or the opening in the grille on the eastern side. Pull yourself through the opening into the outside area with the Clawshot.
Below you there is a round guide for the Spinner. Use it and press the corresponding attack button repeatedly. The gear begins to turn and a huge stone bridge extends.
Climb back up and cross the new bridge. Beware of the Kargaroks and the strong gusts of wind. If necessary, use the Iron Boots again.
Small Key 1 of 1
Enter the building at the other end of the bridge. Run to the broken section of the room and look up. There is a grappling hook target above a separate platform on the side.
Pull yourself over and drop down at the Treasure Chest.
Open it and you will get the only Small Key from City in the Sky.
Small Key received: City in the Sky actually only has a single regular Small Key. We will use it just a few rooms later.
Then retreat to the grate and leave the room again.
Argorok destroys the bridge
As soon as you step onto the stone bridge, the huge dragon appears again. This time he flies directly towards the structure and completely destroys it.
The way back to the building you just visited is now cut off.
Don’t worry: this is part of the intended dungeon flow. Later we can return without the bridge with the Double Clawshots and the floating Peahats.
First go through the door into the central hall again.


West wing: Extend second bridge
Back in the central hall, pull yourself to the opposite side using the tendrils or pillars. Go through the western door.
Outside there is another short course over blue floor tiles. Walk over it quickly and don’t stop.
In the next outside area go to the second glider mechanism. Also turn this gear with the Spinner until another stone bridge is fully extended.
Cross the bridge. The strong gusts of wind are particularly dangerous here. As soon as the wind starts, put on the Iron Boots and wait until the gust passes.
At the other end, use the Small Key on the locked door.
wind room and Dungeon Map
In the next room there are several giant wind turbines and helmasaurs.
First go over the solid walkway to the corner and look at the opposite side of the room. There you will see a Crystal Switch.
An arrow is unreliable because of the constant wind. Therefore aim at the crystal with the Clawshot. The hit switches off one of the large turbines.
Then return a little and work your way along the other side of the room. You walk through the wind of the first turbine with your iron boots on.
There are blue floor tiles in front of the second turbine. Here you should take off the Iron Boots again. Instead, use the Clawshot to pull yourself directly onto the tendrils of the distant pillar.
Defeat the next Helmasaur and go through the side door.
Dungeon Map
In the adjacent high tower there is a Treasure Chest right near the entrance.
Open it and you will get the Dungeon Map from City in the Sky.
Dungeon Map received: City in the Sky consists of several towers, external platforms and superimposed levels. The map is therefore much more useful than in many previous dungeons.
Afterwards, return to the room with the large fans.
Through the decommissioned fan
Since we have already activated the corresponding Crystal Switch, one of the turbines is now switched off. Run across the blue floor tiles and cross the disused area.
In the following room there are Keese, ground worms and several short jump passages. If possible, kill the bats with your bow before you dare to jump. You can get the worms hidden under the floor tiles with the Gale Boomerang.
Work your way to the southern door.
Behind you will be locked in with two Dynalfos. Shield Attack and Helm Splitter work great. Alternatively, you can weaken them with bomb arrows or try to push them into the abyss with the shield attack.
After the fight, a grate will open on the upper level.
With the Cumulans through the updrafts
Use the Clawshot to pull yourself onto the vines and then onto the large basket-shaped ceiling switch.
This activates a strong updraft in the middle of the room.
Grab a cumulan and jump into the airstream. The combination of upwind and gliding takes you to the higher platform.
Go through the door.
The following room is also completely based on this principle. Use the cumulans and wait until the wind shoots out of the floor openings.
An updraft initially takes you to an intermediate platform. Pull yourself onto the basket switch there so that the next airflow is activated.
Then take another cumulan and let it carry you through the opening in the wall. Repeat the process on the opposite side.
Finally you reach the next passage.

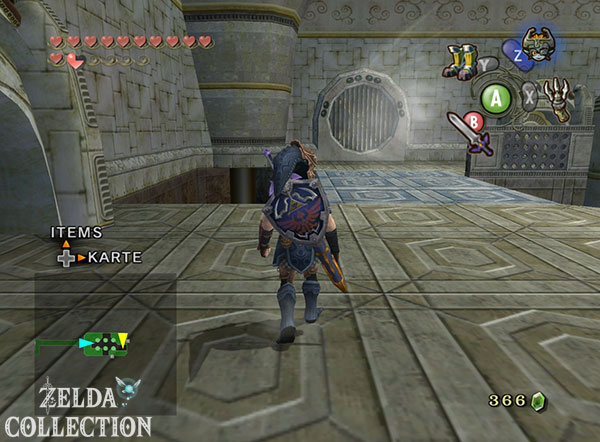


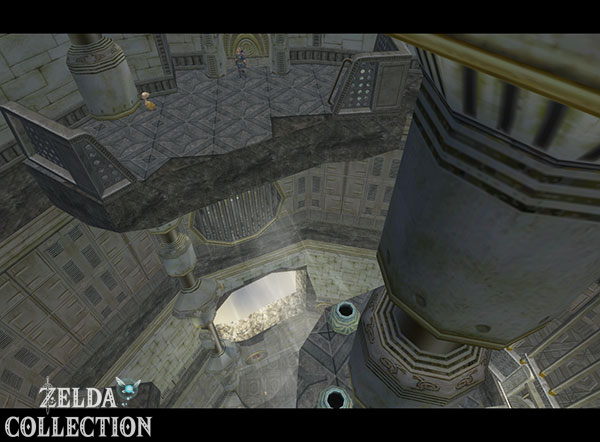
The large wind shaft
You get back into the high tower where we previously found the Dungeon Map – but this time on a much higher level.
From here we have to go all the way down.
Grab a cumulan and glide to the lower platform. Pay close attention to the sideways gusts of wind. If Link gets caught in an active air stream, he can be thrown straight out of the tower.
Therefore, wait for the short breaks and slide down gradually.
At the bottom you will reach a door.
In the following room, a large basket switch hangs directly above a powerful fan. Pull on it with the Clawshot and put on the Iron Boots.
Only the additional weight is enough to pull the switch down completely.
The fan under Link stops. Take off the Iron Boots again and let yourself fall down through the opening.
The Miniboss is waiting here.
Miniboss: Aeralfos – flying lizard knight
The Aeralfos is a flying variant of the already well-known lizard knights. He has a sword, shield and wings – and his shield is also his greatest weakness.
Phase 1: Capture shield with the Clawshot
Aim at the Aeralfos and keep a sufficient distance.
When he hovers in front of Link and holds his shield forward, a grappling hook symbol appears on it.
Shoot the Clawshot at the shield. Link pulls the opponent directly towards him.
As soon as the Aeralfos lands in front of you, attack with several sword strikes.
After a few hits he takes off again.
Phase 2: Attack from the wall openings
The Aeralfos now regularly disappears through the large openings in the walls and then flies back into the arena at high speed.
Keep your sights on him and watch the wall openings.
As soon as he appears and holds his shield in front of his body again, use the Clawshot again. Pull him out of the air and follow up with the sword.
If he blocks your normal attacks, you combine Shield Attack and Helm Splitter.
After several successful attacks, the Aeralfos collapses.


Obtain Double Clawshots
After the victory, the grate in front of the large chest opens.
Open it. Link receives a second Clawshot. Together with the already existing Clawshot, the Double Clawshots is automatically created.
New item: Double Clawshots
Link can now shoot a second Clawshot while still attached to the first. This allows us to move from target to target without solid ground.
This ability changes the entire dungeon.
First pull yourself to a target above the arena. While Link is hanging there, aim the second hook directly at the next target.
Work your way back up into the large wind shaft bit by bit.
With the Double Clawshots to the Compass
There are numerous targets on the walls in the spiral shaft.
Pull yourself to the first one and shoot the next one while hanging. Only loosen the first hook after the second one is securely attached.
Further up you will reach a basket switch. Pull on it. However, the corresponding grate only opens as long as Link is hanging on the switch.
Therefore, stay hooked and slowly lower the rope. As soon as you are approximately level with the opened passage, use the second hook on one of the targets behind the gate.
Go through the door.
In the following room, several long pillars hang over a bottomless abyss. Many of these begin to fall shortly after hooking.
Therefore, plan your route before each shot. Pull yourself immediately from one pillar to the next and never get stuck unnecessarily.
A Treasure Chest is waiting at the other end.
Open it and you will get the Compass.
Compass received: From now on all unopened Treasure Chests will be displayed on the Dungeon Map. This is particularly helpful for the two Pieces of Heart and the HD stamps.


Under the bridge back to the central hall
After the Compass you get outside and find yourself under one of the previously extended stone bridges.
There are large metal grilles on the underside that the Double Clawshots can detect.
If possible, destroy the hanging Deku Babas with arrows before moving past them. Then move from grid to grid.
At the end you will see tendrils. Hook up, climb up and return through the door to the central hall.
Twilight Princess HD: Stamp “Ooccoo”
Only in Twilight Princess HD: With the Double Clawshots we can now get one of the previously unattainable treasures.
Go back to the area behind the bridge destroyed by Argorok. Cross the room with the numerous targets and bars.
Shortly before the exit there is an additional platform on the opposite side with a Treasure Chest. Use the Double Clawshots to pull you there.
In the chest is the stamp “Ooccoo”.
This gives us the first of three HD stamps in City in the Sky.
Peahats replace the destroyed bridge
Argorok may have destroyed the first major bridge, but the Double Clawshots now opens up a completely new path for us.
Several large Peahats or Peahats float above the abyss. Your underside can be captured with the Clawshot.
Move to the first plant. Wait for it to move into a favorable position, then use the second hook on the next one.
This is how you cross the area of the destroyed bridge step by step.
There are narrow openings in walls in several places. Link does not fit through when retracted. So let the grappling hook rope down until Link is hanging below the wall. As soon as the chain fits through the opening, you pull yourself onto the next Peahat.
Piece of Heart 1 of 2 – in the high south tower
The next large room is dominated by a huge Deku Baba.
First hit the large flower several times. Once it is destroyed, the voracious plant body remains.
Throw a bomb inside. The explosion eliminates the plant for good.
Now a longer vertical climb begins. Use the targets on the double hook and the vines on the walls.
Some of the stone pillars collapse as soon as Link hangs on them. So switch to the next target immediately.
About halfway up you reach a narrow ledge in the wall. First kill the Keese and Deku Babas with arrows.
There are two Treasure Chests on the platform.
One of them contains the first Piece of Heart from City in the Sky.
Piece of Heart 1 of 2: This Piece of Heart is off the direct route to the top and is therefore easily overlooked.


Poe Soul 1 and Stamp G
After the tower you will reach a spacious outdoor area full of floating killer anas.
First observe their flight paths. Many plants move back and forth between different platforms. With the Double Clawshots you can switch from one to the next while driving.
First move south. One of the killer anas will take you to a remote island with a tree.
Drop yourself there.
A ghost is waiting on the island. Transform into Wolf-Link, activate the sense and defeat him.
You will receive the first Poe Soul from City in the Sky.
If you have completely followed our route so far, it is Poe Soul 56 of 60.
Twilight Princess HD: Stamp G
Only in Twilight Princess HD: On the same remote island stands another Treasure Chest.
Open it and you will receive the stamp with the Hylian letter G.
This means that only the Z stamp is missing from City in the Sky.
Piece of Heart 2 of 2 – Southern Peahat Detour
Return to the main area with the Peahats, but don’t leave yet.
Another flight route leads to a door far to the south. To reach it, you have to switch between the Peahats several times while moving.
In the narrow wall openings, extend the grappling hook rope again so that Link hangs low enough.
When you reach the southern platform, go through the door. You are now on a previously unreachable ledge in a known space.
There is the big Treasure Chest with the second Piece of Heart from City in the Sky.
Pieces of Heart in City in the Sky complete: Both Pieces of Heart of this dungeon are now in our possession.


Central Tower: Vines and Wolf Ropes
Then follow the main path to the central red tower.
In the courtyard you pull yourself onto the tendrils of the outer wall with the Double Clawshots. Climb up.
On the higher level, several thin ropes run between the parts of the building.
Transform into Wolf Link. Only in wolf form can you balance safely on these ropes.
Before you set off, you should take out all Kargaroks and other flying enemies with your bow or bomb arrows. A hit on the rope can send Link flying straight into the abyss.
Poe Soul 2 and Stamp Z
First follow the outer wall against the direct route to the tower entrance.
Climb up the vines and transform into Wolf-Link again. Cross two more ropes.
The second spirit of City in the Sky is waiting on the remote platform.
Activate the sense and defeat him.
You will receive the second Poe Soul from City in the Sky. On our through route it corresponds to number 57 of 60.
Twilight Princess HD: Stamp Z
Only in Twilight Princess HD: There is a Treasure Chest right next to the Poe Soul.
Inside is the stamp with the Hylian letter Z.
We have now found all three stamps of this dungeon:
- Ooccoo
- Hylian G
- Hylian Z
Big Key
Return to the main route via the ropes. Now follow the ropes towards the central tower and enter its upper floor.
There is a huge fan inside. The large Treasure Chest is still easily accessible.
Open it and take the Big Key.
Big Key received: The door to Argorok can now be opened. Before that we have to activate the central wind machine and climb up to the highest tower.


Switch the central wind machine
A large basket switch hangs on the ceiling directly above or near the master key chest.
Pull on it with the Double Clawshots and put on the Iron Boots.
Link’s weight pulls the switch down. The huge fan beneath you comes to a stop.
Take the Iron Boots off again and pull yourself to the grid above the disused rotor.
Slowly lower the grappling hook rope between the rotor blades.
As soon as Link is hanging below the fan, you look at the ceiling of the lower floor. There is a second basket switch there.
Shoot the free hook onto it and put the Iron Boots on again.
This will activate the large wind machine in the northern part of City in the Sky.
Drop down and go through the north door.
Rotating rotors and the path to boss
There is a huge abyss in front of you, over which several large rotor platforms are now circling.
Your metal grilles can be captured with the Double Clawshots.
Pull yourself to the first rotating platform and wait until the next one is within range. Shoot the second hook and cross over.
Some grids can only be captured from one side. So turn the camera regularly and look for the next target early.
At the end of the passage, drop down onto the platform by the door.
Two Aeralfos in front of the boss door
In the next room grab it straight away two Aeralfos at the same time.
Concentrate on one opponent if possible. As soon as someone presents their shield, you pull it in with the Double Clawshots and use the sword to attack it.
Try not to attack the second knight at the same time. Once the first one is taken out, the fight becomes significantly easier.
After the victory, pull yourself up on the grate above the entrance.
Then hook onto one of the rotating platforms and hit the Crystal Switch on the wall while hanging. This causes more platforms to begin rotating.
Move further up with the Double Clawshots.
At the highest point there is a target right next to the big door.
Pull yourself over and use the Big Key.
Boss: Twilit Dragon Argorok
After opening the boss door, you will initially be standing below the actual arena.
Look up and use the Double Clawshots to pull yourself up on the bars and tendrils of the huge stone pillars.
The dragon that has been chasing us since our arrival is waiting on the highest platform in City in the Sky: Argorok.
The battle consists of two distinctly different phases. For both you need the Double Clawshots; in the first phase the Iron Boots.
Argorok – Phase 1: Destroy the armor
Argorok initially circles around the tower and regularly attacks in a dive.
Keep moving and roll to the side immediately before impact.
After certain attacks, the dragon briefly stops near one of the stone pillars or hovers at a low height.
There is a grappling hook area on its tail.
Aim at the tail and pull yourself over with the Double Clawshots.
As soon as Link is hanging by the tail, put on the Iron Boots.
The extra weight pulls Argorok down. The dragon hits the platform with full force and parts of its armor shatter.
Argorok then rises higher into the air.
Now you first have to climb the large stone pillars. Use the Double Clawshots to pull yourself up from grid to grid.
As soon as you are approximately at the dragon’s height again, wait for a suitable moment, pull yourself onto its tail again and put the Iron Boots on.
After the next serious fall, the rest of his armor breaks.
A large glowing weak spot becomes visible on Argorok’s back.


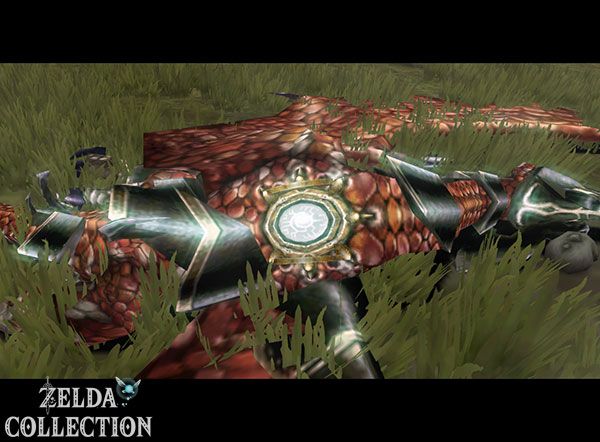


Argorok – Phase 2: Circling around the dragon with the Peahats
After losing his armor, the entire arena changes.
A thunderstorm is brewing and heavy rain is beginning to fall. Through the water, several large Peahats begin to float high above the stone pillars.
First climb one of the pillars again with the Double Clawshots.
Then pull on the first Peahat.
Argorok hovers in the center of the circle and begins to direct a long beam of fire at Link.
Now it’s all about speed.
Switch from one Peahat to the next with the Double Clawshots and move continuously around Argorok. If you stay on the same plant for too long, the fire beam will catch up with you.
Automatic target detection helps with quick switching between plants. Still, make sure you’re actually targeting the next Peahat and not Argorok itself.
As soon as you get behind the dragon, its glowing weak spot on the back becomes visible.
Shoot the Double Clawshots directly at it.
Link is pulled onto Argorok’s back.
Attack the weak spot with as many sword strikes as possible. After a short time the dragon throws you off and the process begins again.
Argorok’s change of direction when breathing fire
After the first successful attacks, Argorok changes his tactics.
He first spits the jet of fire in one direction and then surprisingly turns around.
If you continue to stubbornly switch between Peahats in the same direction, you will walk straight into the flames.
As soon as Argorok changes direction, you also have to reverse. Use the next accessible Peahat on the opposite side and move behind the dragon again.
Pull yourself back onto his weak spot in the back and attack with the sword.
According to total three successful attack phases on his back Argorok can no longer fly and falls into the depths.
Last Mirror Shard and Heart Container
After the victory, the sky clears over City in the Sky.
Argorok leaves behind a Heart Container. Be sure to pick it up so that Link’s maximum health permanently increases by one full heart.
Even more important, however, is the artifact that emerges from the defeated dragon: the fourth and final mirror shard.
This means that all parts of the Mirror of Twilight are finally in our possession.
City in the Sky completed:
✓ 1 Small Key
✓ Dungeon Map
✓ Compass
✓ 2 Pieces of Heart
✓ 2 Poe Souls
✓ Double Clawshots
✓ Big Key
✓ 3 HD stamps
✓ Heart Container
✓ fourth mirror shard
City in the Sky leave
After a short conversation with Midna, you will be taken back to the entrance area of the city.
Go to the large sky cannon at the edge of the platform. There is a grappling hook area on the back.
Pull yourself in.
The cannon throws Link back through the cloud cover and straight to the Lake Hylia.
Our next main goal is now clear: We have to return to the Mirror Chamber in the Gerudo Desert with all four mirror shards.
However, with the Double Clawshots, Link now also has the last tool that is needed for several previously unattainable collectibles and for the complete passage through the Cave of Ordeals. On a consistent 100% route, it is therefore worth planning a few catch-up discoveries before you finally set out for the shadowy realm.
With City in the Sky one of the most demanding dungeons of Twilight Princess is behind us. The entire journey took us from the first gliding flights with the Oocca to huge wind machines to Aeralfos and finally to Double Clawshots.
We have collected both Pieces of Heart and freed both Poe Souls from the sky city. Twilight Princess HD players also own the three City in the Sky stamps Ooccoo, G and Z. You can find more HD locations in our overview of the stamps.
Especially the Double Clawshots will help us in many ways. With it we can now also master those grappling hook passages in Hyrule that could not be solved with just one hook.
After defeating Argorok, the Mirror of Twilight is finally complete. Our Twilight Princess walkthrough continues with the return to the mirror chamber and then the Palace of Twilight.
The last Piece of Heart in Kakariko Valley with the Double Clawshots
Go to City in the Sky to the large rock formation in Kakariko Valley. Pull yourself to the first target and, while still hanging on the first, use the second hook for the next target. From there, switch to the vines of the smaller rock formation, climb around the wall and up to the chest with Piece of Heart 43. The single Clawshot wasn’t enough for this episode.
With the Double Clawshots before the final collect
Visit the second STAR course for the 100-arrow quiver. Get open double hook heart pieces and the Poe Souls in City in the Sky while you can still see the rooms. Now you can also completely traverse the Cave of Ordeals; their three souls are on levels 17, 33 and 44. The Mirror of Twilight then leads to the Palace of Twilight.